Welcome to my blog!

News from a wargamer with a special interest in the military history of the Balkans. It mainly covers my current reading and wargaming projects. For more detail you can visit the web sites I edit - Balkan Military History and Glasgow & District Wargaming Society. Or follow me on Twitter @Balkan_Dave
or on Mastodon @balkandave@mastodon.scot, or Threads @davewatson1683

Thursday 31 August 2023

Strength and Honour

 These are the new rules by Mark Backhouse for fighting the epic big battles of the ancient world. I played these at Partizan in a refight of Cannae. The outcome of using Hannibal's tactics was historical, and it was the first time I felt this classic battle had been faithfully reproduced on the tabletop. The downsize (pun intended) is that the game is designed to be played with micro armies (typically 2mm). My experience of playing 3mm WW2 games has not previously encouraged me in this direction. However, here, the unit blocks are placed on a large base, which is easy to identify and label.

So, I bought the rules and a batch of figures from Antonine Miniatures (Warbases). My first matching armies were the Dacians and Romans. At this scale, the Dacians will do for almost any warband army of the period. I also bought some pike blocks intending to do some of Alexander's early battles as well.


This was the first batch of painting. I glued the metal blocks onto the bases, which are standard and a little deeper for the Roman legions. The warbands looking suitably irregular and the Roman ten cohort legion supported by auxiliaries. After priming them in brown I painted the legions in red around the edges and the auxiliaries in blue. Then dry brushed the helmets with a few crests for officers. The Dacians got dabbed a range of colours. Then a fine sandy base mix, followed by a green foilage mix. 

The same approach for the second batch, which includes cavalry, two camps and skirmishers. I also bought some scenery pieces from Warbases.


On to the tabletop, meant reading the rules. Much helped by my memory of the participation game at Partizan. Everything you need is in the nicely laid out booklet, plus a downloaded QRF and command board from the Two Fat Lardies site. The game is played on a grid, typically 75mm, so I used my 150mm To the Strongest mat.


You dice for command points and allocate them to the command board. I'm embarrassed to say we largely forgot to use these, but they give various benefits, although you can only use a point once. It doesnt seem to overpower the game as sometimes happens in other rules. 

The key mechanism is activation, which includes movement, combat, charge, shooting and reform. A roll on a D6 means variable movement, which, as I discovered, makes it difficult to keep a neat battle line. This matters as isolated units can come up against supported enemies. Manoevre, which means anything other than straight ahead also has to be diced for and failure means the end of your turn. So, do it last. It also discourages unhistorical dashing about the tabletop, which is all too common in osome other rules.

Combat and shooting is straightforward, based on a unit combat factor with typical modifiers. If you lose then the combat result table can result in a pushback or worse. You are also likely to attract setback or disaster cards which are drawn from a pile and placed face down. These have numbers which added together can reach the break point for the army. We didn't reach that when we had to call it a night, but my Dacians were losing heavily. Never mind, wait till the Romans get into the mountains!


The book has army lists and scenarios as well as some basic campaign rules. Overall, we had a good game and will certainly return to these for when the big battle itch has to be scratched.

Tuesday 29 August 2023

Turkey and the Second World War - A Wargamers Guide

In the first draft of my book, Chasing the Soft Underbelly: Turkey and the Second World War (Helion 2023), I wrote an appendix on wargaming the actual and potential campaigns in the book. However, space precluded its inclusion in the book; in any case, I felt it didn’t do the subject justice. For that reason, I have written a booklet to supplement the detailed history in the book.


This booklet offers a new army and campaigns for Second World War gamers looking for something different. We all love the Western Desert, the Steppes of Russia or the Normandy bocage, but there is another world out there to embrace!

It explains why and how Turkey was involved in the Second World War. How the armed forces were organised, and what you need to model them on the tabletop. The vehicles, tanks, artillery and aircraft come straight out of the lists for the main combatants. Infantry requires a little effort, but this can be done relatively cheaply, particularly in smaller scales. The Turks could have fought most belligerents, so opponents will already be in the collections of many gamers. Germans can invade Turkey during Operation Gertrud, and Russians can do the same from the north at Batumi. These are both actual plans, prepared but not delivered. However, I also indulge in a bit of alternative history, which is the wargamers licence.

The organisation and doctrine of the Turkish armed forces are outlined, along with army lists for some of the most popular WW2 rules. There are eleven scenarios to get you started, with maps and illustrations from my collection. Turkey’s strategic position offers battles in European Thrace, the Caucasus mountains, or the sands of the Middle East. Something for everyone. That includes naval and air warfare scenarios.

Each of the eleven scenarios gives the historical background, the orders of battle, objectives and a tabletop map. I conclude each scenario with an analysis of what might have happened.

This is from the Operation Hercules scenario - the invasion of Rhodes.

When writing history books, there are legitimate constraints when you stretch away from actual events. So, I enjoyed the freedom writing this booklet gives. It is a good value (just a fiver) PDF download because I accept this is a niche interest, and in full colour, it would be prohibitively expensive to do a print version. 

This is the contents page, and you can get a copy here.


Friday 25 August 2023

Wing Commander

 Wing Commander is a compendium or supplement to Warlord's Blood Red Skies game of air warfare. This is my go-to set of air warfare rules at present, with a nice balance of playability.

The game designer Andy Chambers has brought together some of his favourite material created by players. A chunk of this material comes from the guys who produce the Lead Pursuit podcast, which I occasionally listen to. Episode 109 covers Wing Commander. They also appear to run a series of games at conventions in the USA.


The booklet starts with a chapter on tactical tips for beginners, which I found very useful. This is followed by a solo enemy flowchart that I will have a go at as the game is not played at my club. There is a short, simple campaign for carrier battles based on the Pacific in 1942. It's not my gig, but it could be adapted.


The book arrived just as I wrote an air warfare scenario for my forthcoming wargamers guide to Turkey and the Second World War. I used the bomber escort scenario in the main rules, but the amendments here are a definite improvement. In particular, 'The bombers move last' rule helps keep bombers in historical formations. 


There are several scenarios for the Korean War, one of my current projects, so that I will give this a go. As short-range air-to-air missiles began to be introduced in this period, there are some rules and a scenario. Stretching the rules a bit further is a chapter on the 1965 Indo-Pakistan War, a conflict I have done the ground war for and fancy trying the air war. Warlord doesn't do models yet for this, but there are 1/200 manufacturers who do: Hawker Hunter, Folland Gnat and Mig-21s, amongst other aircraft types.


The largest chapter is a campaign system. I probably won't do this, but it looks well-designed and allows the player to tailor the level of depth they want to get into. The aircraft availability chart for WW2 is a standout piece of research. There are also stats for every aircraft that fought in the period covered by the rules, which allows the deployment of models not in the Warlord range. 


Finally, a helpful FAQ chapter and errata pages for the main rules. Sadly, it is a requirement for many Warlord products. 


You will want a copy of this if you are a Blood Red Skies player. They are nicely laid out with plenty of eye-candy inspiration as well.


Some of my models and the main game aids.


Thursday 24 August 2023

High Tide in the Korean War

 This book by Leo Barron tells the story of the US 23rd Infantry Regiment at the Battle of Chipyong-ni in the Korean War. I have been dabbling in the Korean War and spotted this in my local library. Although the Turkish contingent was not directly involved in this battle, it is an excellent study of a unit level action in this conflict.


Allowing for the author's hype, it is a remarkable story of how a single US regiment, with an attached French battalion, fought off several Chinese divisions near the Han River in February 1951. This was just after Matthew Ridgeway took over command of the US Eighth Army with his more aggressive strategy.

The 23rd Infantry regiment was undermanned and underequipped like most of the US Army at the start of the Korean War. Post-WW2 cuts affected all the armed services, and this regiment was no exception, calling on volunteers from other units to make up the numbers. The US Army had decided that anti-tank guns had failed in WW2 and were replaced with Sherman tanks. I hadn't appreciated this fact, and frankly surprised, but any excuse to get armour on the table. The Chinese Air Force was not a significant threat to ground troops, so the quad AAs on the M16s were used in the ground support role. They also had a battery of 155mm howitzers, a combat engineer company and a Ranger company. The flexibility of the US Army structure was evident in this operation.

The regiment was sent on a probing operation to find the Chinese army, exposing it to mountainous terrain with only one road to their target. They dug in on a couple of hills, and the Chinese sent waves of troops against them. They were aiming for a critical road junction behind the position. 

Much of the book covers very similar actions, which can get a bit repetitive once you have read a couple. The Chinese attacked at night, and the emplaced American and French troops gunned them down, causing horrendous casualties. Brave does not begin to describe these mostly frontal attacks. When US aircraft could fly ground attack missions, they also caused heavy casualties with napalm, breaking the back of several assaults.

You can pick out some operational details that will interest wargamers. For example, Chinese mortars were very accurate. As one rifleman said, 'Those bastards could drop a 60mm mortar on a dime and get change.' My mortars rarely hit anything on the tabletop! Close air support was deadly, and after reading some of the descriptions, I won't be complaining about their effectiveness again. Grenades were also favoured over rifles, partially because, at night, rifle fire was easy to spot. The Thompson sub-machine was unpopular because it was too easy to spot. The Chinese also used satchel charges on the end of poles, which were dropped into foxholes.

It may be a cliche, but the 23rd was relieved by the cavalry. In this case, the 5th Cavalry fought its way up the road and over the surrounding hills. In Korea, the best commanders learned that you always took the high ground. Although the cavalry, organisationally, was an infantry regiment with armoured support. However, the infantry rode on the tanks in all but the forward echelons. After this battle, the initiative shifted back to the UN forces, although the war quickly ground to a halt before an armistice was eventually agreed.

If you want to understand how units deployed and fought in the Korean War, this book is for you. Lots of detail, and you can skip over the repetitive bits. Many thanks, as usual, to my local library. Long may they continue!

One of my recent Korean War games


Tuesday 22 August 2023

The Bruce Trilogy

 I have been a bit slow recently with my chronological Nigel Tranter re-reading project. In part, although this book covers some of the most stirring events in Scottish history, it is also three books and over 1,000 pages. 


The first book, The Steps to a Vacant Throne, deals with the period before Robert became King of Scots. Note, not King of Scotland, an important Scottish monarchial difference. Tranter takes a sympathetic approach to Robert's actions in this period, which, while conceding that he supported Edward I against the Scots, also has him as a supporter of Wallace. He even has him rescuing Wallace at the Battle of Falkirk. This history is contested, and some chroniclers have him fighting on Edward's side in this battle. On balance, he was probably not present on either side. Modern nationalism played no part in these struggles, as the landed elite in both countries (outwith the Highlands) largely came from the same Norman stock.

The second book, The Path of the Hero King, covers his accession to the throne after murdering his rival, Comyn in Dumfries church. He was caught napping in the Battle of Methven and was forced to flee to the Isles. Tranter doesn't avoid his romantic interlude with Christina of the Isles while his wife and family were imprisoned by Edward. She is a character in her own right, and I highly recommend a visit to her Castle Tioram in Moidart.


Robert rebuilt his strength with the notable support of the Lord of the Isles and began a comeback on the mainland. He fought a series of small battles against the occupying forces culminating in the Battle of Loudoun Hill (not far from me). Edward was in the process of another massive invasion when he died. Edward II was not the warrior his father was but was eventually provoked into another invasion, culminating in the Battle of Bannockburn.

Even for most Scots that was the end of the story. However, Tranter rightly covers the post-Bannockburn period in detail in the third book, The Price of the King's Peace. Edward II refused to agree to a peace treaty, despite his problems at home with his own nobles. The Scots raided deep into England, effectively annexing swathes of the border regions to Scotland. There was also a less than effective campaign in Ireland led by Robert's impetuous brother Edward Bruce. Peace was finally agreed after Edward II's death.

For the wargamer, there is an understandable focus on the large battles, particularly Bannockburn. My own club, GDWS, did this battle on the large scale as a display game at Carronade in 2014. However, this battle was the exception. Tranter brilliantly captures the skirmishes, small battles and raiding that dominated warfare during this period. Lion Rampant is an ideal set of rules for this warfare, and I dusted down some of my Bannockburn armies for a game last weekend. Naval warfare was also important, along with amphibious landings. 


Islesmen get stuck into English bowmen.

This trilogy rates as one of Tranter's best. The history may not be perfect, but it's a cracking read.

Tuesday 15 August 2023

Ottoman Armies 1820-1914

 This is the latest in the Osprey Men-at-Arms series by Gabriele Esposito. It fills a gap in the Osprey coverage of Ottoman armies, although specific conflicts in this time frame have been covered before. In particular, Ian Drury's 1994, The Russo-Turkish War 1877, inspired me to build a 15mm army for the conflict and later an essential reference for a 28mm force.


The author takes a chronological approach to the period, which was one of considerable change. The period starts at the end of the Napoleonic Wars, which I covered in my new book, The Frontier Sea. Many attempts had been made to reform the Ottoman military, and this was finally achieved in the 1820s with the disbandment of the Janissaries (The Auspicious Incident) and, later, the semi-feudal cavalry, the Sipahis. By the end of the decade, the Ottoman state had the core of an army organised on modern lines. However, it was only a core, insufficient for a wartime army, and irregulars remained an essential element of the military during wartime.

This was demonstrated during the Tanzimat period 1840-53, particularly when challenged by Egypt in the war of 1839-41. So, in 1843 the army was expanded considerably, including conscription (1848) and the creation of a reserve (Redif). Regular light infantry and cavalry units were also introduced. 

The Ottoman armies that fought in the Crimean War have not always been given the credit they deserve, with most accounts ignoring the fighting in Moldavia and in the Caucasus. Even less well known are the irregular units officered by British and French officers, and the line regiments bolstered with British cadres. There were also Polish volunteer units.

This painting is of Tunisian troops sent to Balkans in 1877, in the Tunisian Military Museum.

The Russo-Turkish war of 1877, has been the subject of detailed work since Ian Drury's 1994 Osprey. Most notably, Quintin Barry's War in the East, and a special favourite of mine Frank Jastrzembski's, Valentine Baker's heroic stand at Tashkessen 1877. The Ottoman forces had to be reformed again after this war, which addressed the manpower shortages, but not the quality. There were some minor reforms in 1890s, with irregular units (Hamidye) still required in border regions.

Finally, we have the Young Turks period, with further reforms that took the army through the Balkan Wars and the First World War, which ended the Ottoman Empire. There are also descriptions of the vassal states, including Egypt, Tunisia, Serbia, Montenegro, Moldavia and Wallachia. These also provide some of the most colourful and original colour plates in the book. Moldavian lancers look terrific, as do Egyptian cuiraissiers. 

If you have any interest in the Ottomans, this is a must read. 

My 28mm Turkish cavalry and artillery for 1877


Sunday 13 August 2023

Empire First

 It has been said the world is divided into those who venerate Churchill and those who hate him. If you are in the first category, this book will not be good for your blood pressure. Empire First is Graeme Bowman's study of Churchill's opposition to Operation Overlord, the invasion of France in WW2.


The author's thesis is that Churchill prioritised British oil and empire interests in the Mediterranean over efforts to liberate Europe from fascism. Churchill's prosecution of a Meditteranean strategy is not in dispute. It has been examined by eminent historians like Sir Michael Howard in his classic 1968 study. And more modestly, in my own book, Chasing the Soft Underbelly. Howard was kinder to Churchill, arguing that he was the catalyst for a much broader view amongst the military establishment whose memories of the killing fields of WW1 and lack of resources drew them away from the direct route into Hitler's Germany. In fairness, Bowman also highlights these factors and adds Churchill's low opinion of British military capability. A view reinforced by the capitulation of Singapore in particular. Brooke shared this view arguing that the cream of manhood had been lost in WW1. Consequently, they believed Overlord to be beyond the Army's capacity. 

Memories of Churchill's interwar calls for rearmament tend to gloss over his spell in the Treasury in the 1920s when he fully supported the government's economic austerity policies, which included massive defence cuts. Bowman also points to Churchill's less-than-outright opposition to negotiations with Hitler in 1940 while accepting a Fabian strategy may have been involved. After rallying the country in 1940, he is not the first historian to point to Churchill's failures, including Norway, Greece, the Dodecanese and the Far East. 

On the Mediterranean strategy, there is nothing new in his analysis of the events of 1942-3. The conferences, reports and debates between the British and Americans are dissected in detail. Churchill's pursuit of his Balkan strategy right into 1944 is probably less well known. Bowman rightly highlights the weaknesses of this strategy, with little attention paid to the defensive advantages well-equipped German troops had in Italy rather than the plains of Northern Europe. The Balkans lie 1200 miles from the Rhur in mountainous terrain, a point well illustrated by the topographical maps in the book.

 Churchill's optimism over Turkey's entry into the war is also covered, and I largely agree with Bowman on this. I am less convinced by his arguments over Izmir and the Dodecanese campaign. Still, in general, Churchill ignored the advice he was given on Turkey, including his access to Turkish diplomatic cyphers.

The American analysis that British designs in the Mediterranean were designed to protect the empire and British post-war interests certainly had merits. Churchill and Brooke were reluctant participants in Overlord, dragged into it by the Americans and the Russians. It was also about checking Soviet advances in the Balkans, and Bowman offers a fascinating alternative history on this point. He argues that if Churchill got his way, Allied troops would be fighting slowly through the Balkans while the Soviets swept across the North German plain, ending the war at the Channel. A post-war Europe divided North/South rather than East/West.

It is hard to disagree with the thrust of Bowman's thesis, which is well-researched and argued. He possibly goes a little far occasionally and doesn't include other interpretations that reflect Churchill's often contradictory positions. Churchill was, at heart, a 19th-century imperialist and it would therefore be surprising if he didn't put Empire first. I take a more balanced view of Churchill overall, but having studied the same sources, he was wrong about the Mediterranean strategy, whatever his underlying motives. 

US Rangers storm the harbour at Durres, one of Churchill's 'soft underbelly' schemes.


Wednesday 9 August 2023

War around Ragusa (Dubrovnik) in 1806

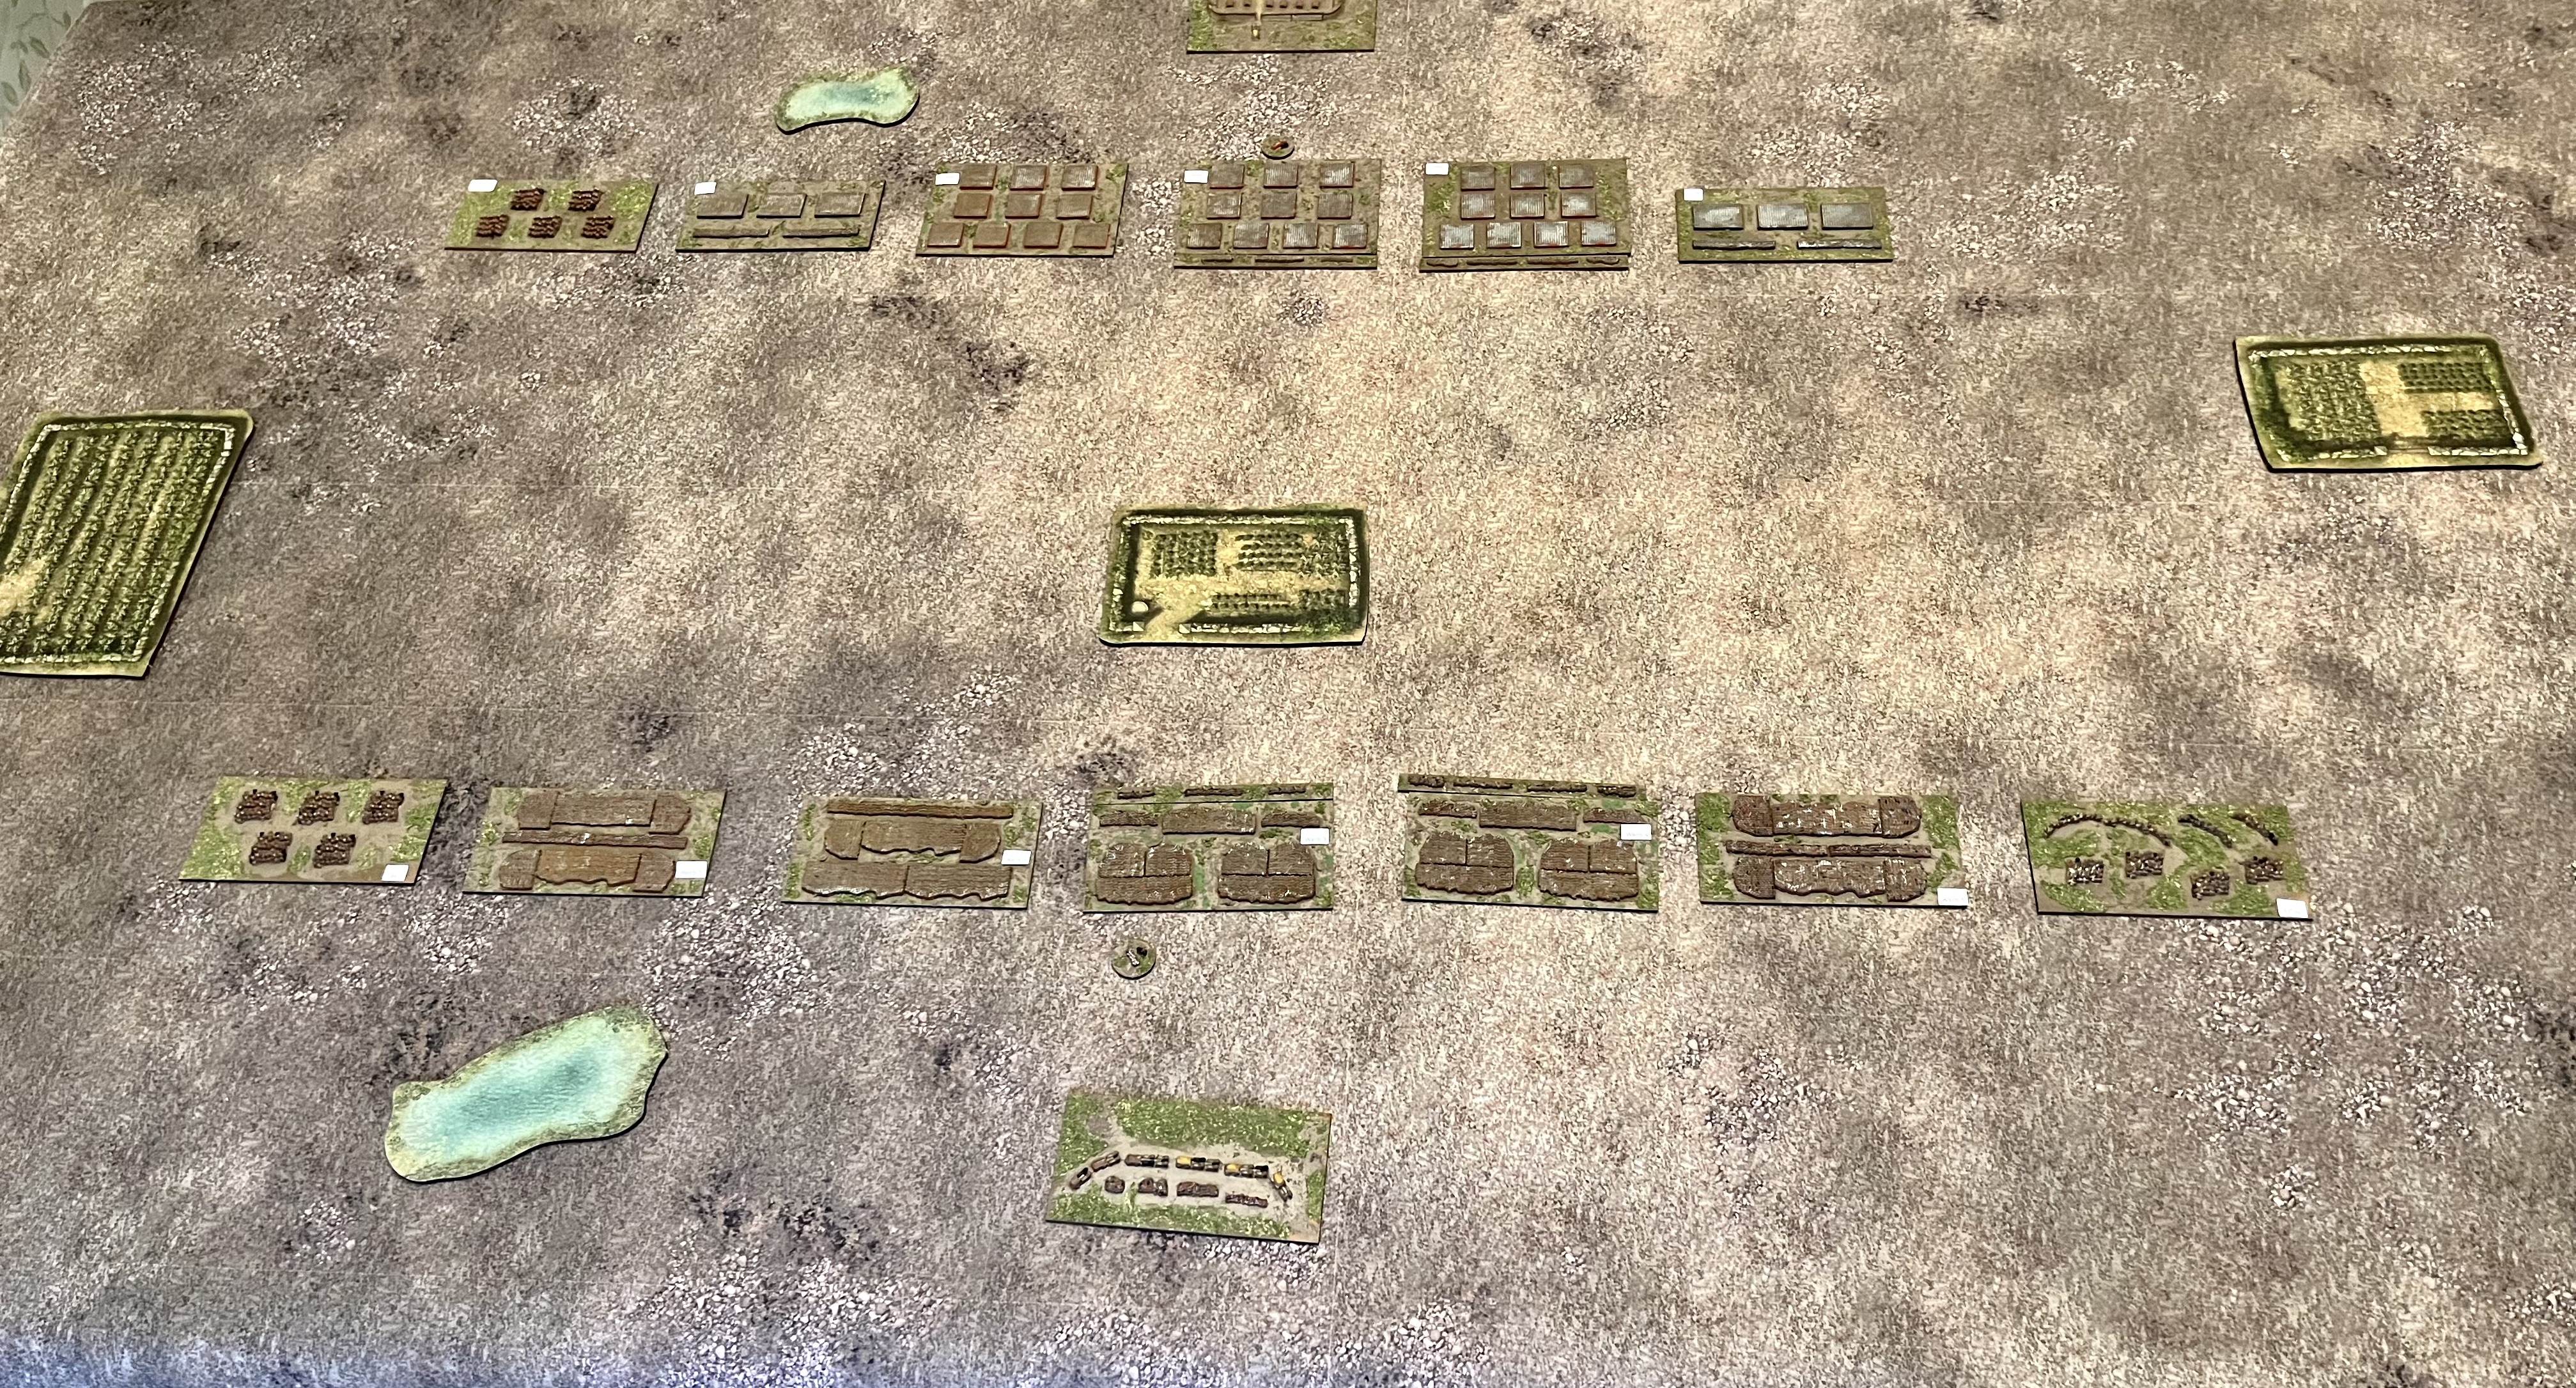
 In my new book, The Frontier Sea, I cover Russian attempts to capture Ragusa (Dubrovnik) in 1806. This includes the Battle of Bergatto Heights, which is also a wargame scenario in the appendix to the book. 


My primary source for this little-known campaign was the memoirs of V. Bronevskiy, a Russian naval officer (Northern Tars in Southern Waters, Helion, 2019), who served with the Russian fleet in the Adriatic. While he covers the Battle of Bergatto Heights in some detail, he quickly skims over the earlier actions around Old Ragusa (Cavtat), where the Russians landed and the subsequent siege of Ragusa. I am therefore grateful to the Croatian archaeologist Nikola Cesarik for pointing me to an article published in the Croatian journal Kolo, War around Dubrovnik in 1806. This article covers the diary of an Italian observer of the events of 1806, Francesco Maria Appendini. It is confusing in places (he couldn’t have been at every action), but it adds to our understanding of the campaign. Old Ragusa (Cavtat) is 20km south of Ragusa (Dubrovnik), a modern tourist spot near the airport.

The first clash was south-east of Old Ragusa on 30 May, where 300 French troops clashed with a similar number of Montenegrins around Tarcikovac. It appears to have been a running skirmish lasting around five hours, with limited casualties, other than an unfortunate French sergeant whose severed head was subsequently recovered and sent to Ragusa by locals for the reward.

On 3 June, the Russians landed around 150 troops from a frigate, successfully attacking French batteries near Ragusa. They were supported by gunfire from the frigate, naval gunfire being a key element of Russian strength in this campaign. However, this does not appear to have been a significant landing attempt, as the action then shifted back to Old Ragusa, presumably because the Russians needed a harbour.

There appears to have been some further fighting south of Old Ragusa, which also involved Ottoman troops (the border was close to the coast here), barring the passage of Montenegrin and Russian troops. However, the French decided that Old Ragusa could not be defended and built several batteries along the coast to delay the Russian and Montenegrin advance towards the Bagratto Heights. The diary doesn’t say which Russian units were involved, but based on Bronevskiy, it was probably detachments from the Vitebsk Musketeers and 13th Jager Regiment, commanded by Major Zvyagin.

Appendini doesn’t have much to say specifically about the Battle of Bagratto Heights and merges it with several clashes inland involving the Montenegrins and on the coast where Russian naval firepower was critical again. His main narrative moves to the siege of the city, where the Russian batteries were established on the heights above the city. Anyone who has visited the city can only wonder at the effort involved by Russian sailors to get heavy naval guns up to those heights. A feat repeated by British sailors in 1814. The Montenegrins focused on plundering the surrounding area, and there were several sallies by French and Ragusan troops to dislodge Montenegrin sharpshooters. 

The walls of Ragusa

The main Russian effort was to capture the island of San Marco, which dominates the approaches to Ragusa harbour. 600 Russian naval infantry and a company of Jagers landed on the island supported by gunboats. However, the French fort on the island was too strong, and the Russians withdrew, with 13 killed and 57 wounded. 

The diary describes the deprivations of the citizens starving and short of water in the city. This was relieved when Molitor’s French column arrived. The Russians began a withdrawal to Old Ragusa, where they embarked while the Montenegrins headed home with their plunder. Appendini was understandably not a fan of the Montenegrins, who he says, ‘The passion for stealing runs in their blood.’ 

As military history goes, the diary is a difficult and confusing read. However, it adds much more detail than we have from other sources and is certainly more objective than Bronevskiy. I will certainly be taking it with me on my next visit. For the wargamer, the many skirmishes he describes are ideal for small actions using rules like Sharp Practice or Rebels and Patriots.


Sunday 6 August 2023

Claymore 2023

 It was the Claymore show in Edinburgh yesterday, one of two big shows in Scotland each year. It is held in the Edinburgh College, Granton campus, which offers two large halls and some side rooms. Good access with plenty of car parking and OK public transport links.

I was running a participation game for Glasgow and District Wargaming Society, so I only had time for a quick scout around the show and traders. I picked up some scenic items for Strength and Honour, but Warbases didn't bring their Antonine Miniatures range, so my credit card was saved for a few days at least. The other items on my shopping list were unavailable at different stalls, so my spending was minimal.

The participation game was, First to Land!, a Napoleonic harbour game loosely based on the Grado scenario in my, The Frontier Sea book. The book sold well on the day, which was great.

There was a significant increase in participation games at this year's show, which the organisers hope might be a trend. We have shifted to participation games in recent years with mixed success. Yesterday it worked well, with five games being played. It was a quick game, typically played in 30-40 minutes. We used Rebels and Patriots rules, which are quick to pick up even if you haven't played them before. There is only a little time to play games at a one-day show, and they tend to become a trade show. However, there were more folk hanging around till the afternoon, despite the start of the football season! So, hopefully, that was a consequence of more participation games. We were certainly playing until closing time.

For the record, the British won three games, the French two. 


I only looked at the other games quickly, which is a shame because there were some good-looking, original tables. Here are a few that caught my eye.

Ancient galleys on the Nile.

A big Pacific War game - Ngesbus.

Loved this Game of Thrones castle. I must finish my Lannisters.

A big naval game, the details of which I still need to remember. But looks good.

Battle of Falkirk using the acrylic stands. 

Barry Hilton's Dutch attack on the Medway game was beautifully modelled.

As usual, a big thanks to the Edinburgh club for organising the event. 

Wednesday 2 August 2023

Peerless among Princes: The Life and Times of Sultan Süleyman

 This is Kaya Sahin's study of Sultan Süleyman, commonly described as The Magnificent in the West, or The Lawgiver in Türkiye. I have several biographies of arguably the best known Ottoman Sultan, but there is certainly room for a modern, scholarly and balanced look at Süleyman. Particularly for those of us reeling from the Turkish TV series, The Magnificent Century!


I found the chapters on his early life interesting. Fratricide may have given the Ottoman dynasty an  advantage in the fragmented political world of Anatolia and the Balkans, enabling its territories to be passed undivided from one generation to the other. However, it was a ruthless existence if you were a prince. While Süleyman reached the throne without having to compete with brothers, his father's route was bloody in the extreme, which must have impacted him. If he had failed, there would have been no Süleyman the Magnificent. Süleyman is the Turkicized Arabic form of Solomon, a point highlighted by him in his poetry.

He inherited his father Selim's considerable conquests, particularly in the Middle East. This is ably covered in Alan Mikhail's book on Selim. The Empire covered 2.5 million square miles and had 20 million subjects. Military conquest was an essential requirement for any Ottoman Sultan. His 1526 campaign and the Battle of Mohacs set the tone for his reign. 

Relationships with the other major powers are not ignored. It wasn't a period of continuous warfare; diplomacy was also important. The Ottomans understood the power structures in Western Europe and their main opponent to the east, Safavid Persia. Their enmity towards the Safavids was in some ways stronger than the European Christians. The Ottomans viewed them as heretics and believed that Safavid propaganda was behind the Anatolian rebellions.

It is difficult to fully understand the importance of personal relationships from historical sources. However, it seems clear that the relationship with his Grand Vizier Ibrahim was crucial to their vision for the Empire as well as his wife, Hürrem. Ibrahim's execution meant losing his closest associate. For the rest of his life, he refrained from making other close friends, becoming increasingly lonely at the top of the state. The death of his sons Bayezid and Mustafa and their families, while not unusual in late reign Ottoman power struggles, cannot have been easy.

Süleyman did his best to ensure that his legacy would be viewed as he wished, through his own history, the Sulaymannama and his charitable works. This partly explains why he is probably the best-known Sultan, along with his longevity on the throne for 46 years. He also lived at a time when there was an explosion in record-keeping, the expansion of the printing press in Europe, and a burgeoning manuscript culture in Ottoman territories. This positive image is propagated even today through the education system and the present government's promotion of Süleyman’s central role in Ottoman history.

Süleymaniye Mosque in Istanbul, built by Mimar Sinan, Suleiman's chief architect.

The author concludes, 'This is where we now find Süleyman, after centuries of mythmaking and scholarship. He lives on under various garbs, offering shelter with his buildings, keeping academics busy, boring school children, and enticing readers and viewers to dream through him of a world filled with sound and fury.'

There is nothing boring about this book, despite its length. It covers the highs and lows of his reign in a balanced way, setting him in the broader context of the period. Well worth a read.

28mm Sipahi of the Porte


Tuesday 1 August 2023

The Men of Warre

 This is Jenn Scott's study of the clothes, weapons and accoutrements of the Scots at war between 1460 and 1600. This was period of battles against England at Pinkie and Flodden, as well as civil wars and clan warfare.


After an introduction to the period, the largest chapter is devoted to the weapons of war in the period. This was a period of transition, with gunpowder weapons becoming established. The earliest gun casting in Scotland was in 1470, although bombards and expertise were imported. The most famous is Mons Meg, given to James II as a wedding present. The traditional Scottish spear was still important, although getting longer than in medieval times. A law was passed forbidding the sale of spears shorter than 5.5 metres, which is a pike to most of us. This rather destroys the myth that the failure at Flodden was due to unfamiliarity with the pike.

The naval chapter reminds us of the importance of shipping routes in the period and the retention of Birlinns (small Viking-style galleys) on the West Highland coast. They were not much use as fighting ships by this period but were excellent for raiding. I imagined that Birlinns were quite cheap, but the total cost of just one ship cost around one-third of the annual income of one Campbell laird from his estate. The Earl of Argyle could move 3,000 men in his fleet, and the last uprising to restore the Lordship of the isles involved 180 galleys and 4,100 men. The King had large ships that could fight at sea, supplemented by armed merchant ships. These did not come cheap. The Michael (250ft long) took five years to build and cost 30,000 pounds, an amount equal to the Kings annual income. 

This was also the period of the border reivers. This chapter will be of particular interest to those of us playing Border Wars (from Flags of War). Scottish mounted troops were recruited from the Borders and sought after by the French as well. Border reivers used firearms but retained light crossbows, which were more reliable than pistols.  


The chapter on Highland warfare tackles some more myths. We tend to paint up our Highland units ready for a mass charge. However, Scott points to the bows carried by these troops as providing the greatest clue to their battlefield tactics. Sadly, it also appears that bagpipes only appeared on the battlefield in the 16th century. And the earliest mention of tartan is in 1532; whatever Mel Gibson thought!

This is a thoroughly well-researched book on a subject that needed a detailed look to address the many myths. And some lovely colour plates.

Lets have some 28mm Lord of the Isles troops anyway!