Welcome to my blog!

News from a wargamer with a special interest in the military history of the Balkans. It mainly covers my current reading and wargaming projects. For more detail you can visit the web sites I edit - Balkan Military History and Glasgow & District Wargaming Society. Or follow me on Twitter @Balkan_Dave
or on Mastodon @balkandave@mastodon.scot, or Threads @davewatson1683

Tuesday 27 December 2022

Fire and Stone: Siege of Vienna 1683

 Sieges can be challenging to game on the tabletop. The sheer size of most sieges, the time scale and the forces involved conspire against a tabletop simulation. They can also be a bit boring. The solution is often to fight sections of a siege. The Siege of Belgrade springs to mind in the old WAB supplement, but even this was really a battle fought around siege works.

The authors of a new board game have come up with a really interesting game based on one of the classic sieges of the 17th century - Kara Mustafa's attempt on Vienna in 1683. It has just arrived in the UK - arriving in time for my wife's Christmas present to me.

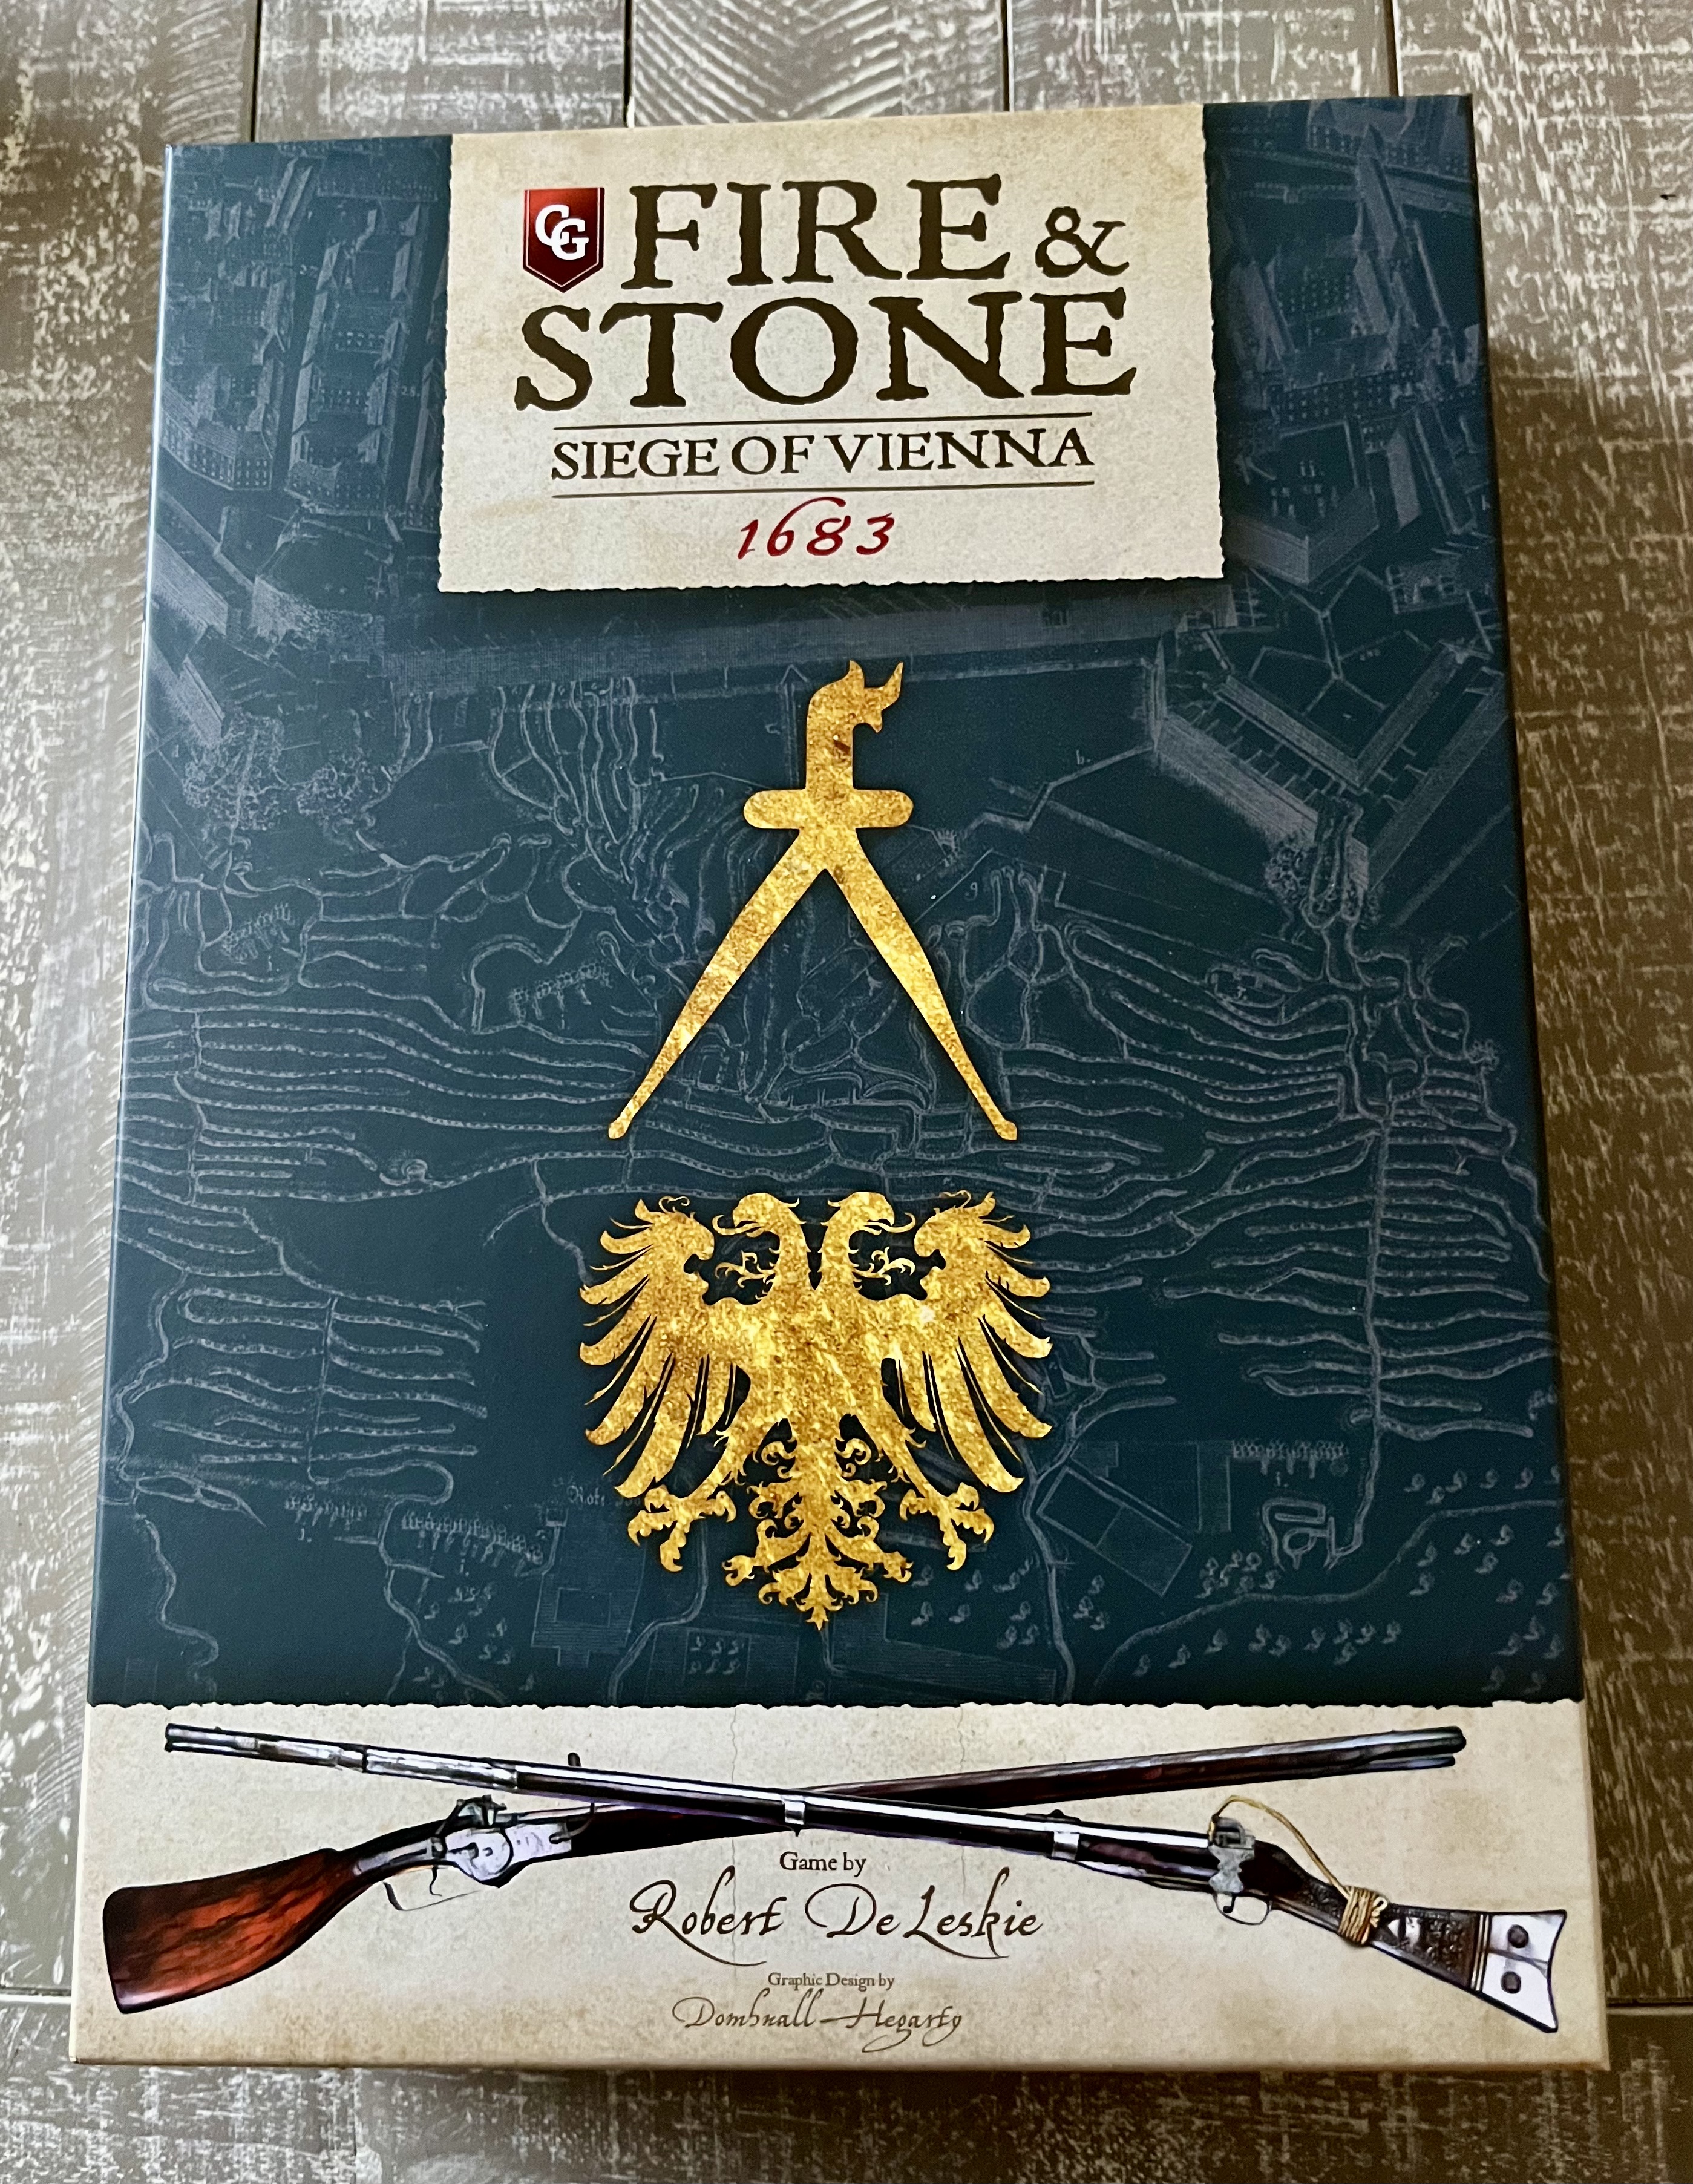
For your money, you get a concise booklet giving the history of the siege, a good quality board, game cards and all the player tokens in wood and card. Everything is high quality, with no flimsy parts. You can replace the board with a gaming mat, but I can't see the need.

My usual complaint about board games is unnecessary complexity. So, I was relieved to see a slim rulebook and a one-page QRS. Set-up time is also quick because you don't need to deploy anything for the troops. This is the board on the first move, with the Habsburg bastions supported by cannon in yellow and the Ottoman camp in red. The morale and move ladders are on the right, and the strategy and troop cards are on the left. There is a section for mining operations, which I didn't use in the first game.


The Ottomans go first, and having drawn five strategy cards, they can use them to take actions like entrench, assault, bombard, or mine. Each card also has a particular strategy that you can use instead of an action. Each side also gets five tactic cards you can deploy to support a specific plan. I played the Ottomans and went straight into an attack on the outer defences. Each side deployed three troop cards (The Ottomans usually get more), and both sides deployed the tactic cards on the right. Battles are resolved in a few phases that depend on bombarding and fortifications. The yellow wooden strips are temporary fortifications.


A successful assault enabled me to bring more cannons into the supporting hex. They then attacked the centre. Here you can see the additional Ottoman cards, which come about for as long as you can trace a supply line to the camp.

Having seen off a couple of Habsburg sorties, I methodically advanced to capture the Ravelin. This had the added advantage of destroying much of the Habsburg artillery. 

In the final moves, I advanced into the open ground, which was easier because the Habsburgs had no fortifications there. Events and successful assaults can move the morale ladder up and down. These two moves brought the Habsburg morale to an end. This ends the game without me having to assault the curtain wall. Control of which is another Ottoman victory condition.


I'm sure I got a few things wrong, but my initial reaction is that this is an elegant game system that gives a decent game in a couple of hours once you have mastered the rules. The basic mechanisms are straightforward while allowing a subtle array of tactical approaches. Not that there was anything subtle in my plan! It is a game that really needs two players, although standard solo-play techniques still give a decent game. My thanks to the Istanbul Wargamers for highlighting this game to me.

Saturday 24 December 2022

Adriatic

 This is a new book by Caroline Boggis-Rolfe covering the history of the lands around the Adriatic. Very timely for my Napoleonic Adriatic project.


I know from experience that there are a few challenges in writing a history of a geographical entity. First, no place exists in isolation, so you must decide how far to stretch the geography to make sense of events. Then you have the choice of which events to focus on, given the timespan is from antiquity to modern times. My interest in the Adriatic is on the Balkan coast, modern-day Croatia, Montenegro and Albania. However, this author is more focused on Italy. In fact, it is a pretty good history of Italy in its own right. The other coast is addressed; it just doesn't get the same attention or the broader Balkan context.

Venice plays a big part in the story of the Adriatic. The author helpfully recognises the earlier period when the Dalmatian expansion was driven more by destroying pirates than by building sea routes. Their falling out with Skanderbeg in the 1450s doesn't usually get much attention either. Skanderbeg defeated the Venetians in 1447 after they supported the Ottomans against him. 

Napoleon's expanding Empire in the Adriatic gets a chapter in the book, with an examination of Marmont as the first governor-general of the region. Ali Pasha also gets a chapter, although there was too much emphasis on viewing him through Lord Byron's eyes for my taste. Instead, there are better observers of the old rogue. She also briefly covers the looting of the Elgin Marbles from the Parthenon, still a topical issue to this day. 

The 19th century was dominated by Italian unification, which was an important event for Italy, but the Adriatic coast was not the focus of those campaigns. Venice had already lost its independence, and the Austrians hung on to these territories for a time. Archduke Maximilian rightly gets some attention due to his command of the growing Austro-Hungarian fleet. A story covered in the Netflix series 'The Empress', which is worth a watch. 

The book wraps up with the story of D'Annunzio, and his short-lived republic on the Dalmatian coast. Italy's enclaves on this coast are a less well-known feature of the WW2 story. Sadly, the author falls into the trap of recent revisionism regarding Tito. Churchill was not 'guided by false intelligence' when it came to Tito. On the contrary, he backed him with excellent intelligence, including ULTRA intercepts, and rightly supported the only resistance prepared to take on the Axis forces.

Overall, this book is a decent overview of the region. I would have taken a different focus, but that is just a matter of choice. There are no new insights, but if you want an introduction to what is a fascinating part of the world, this will do the job.

I have just painted a Congreave rocket launcher. The British provided 600 rockets to Ali Pasha. So here we have the British liaison officer, Captain Leake, explaining to Ali how they work.


Thursday 22 December 2022

Forest of Foes

 This is the ninth book in Matthew Harffy's historical fiction series, The Bernicia Chronicles, set in 7th-century Britain. Specifically in Northumbria and what is today southern Scotland. In the last of the series, our hero Beobrand and his Warband of Black Shields were about to set off on a mission to escort a novice monk called Wilfrid to Rome. This sounded like an intelligent venue shift for the series, as Northumbria was beginning to lose its appeal after eight books. The result is a brilliant story, one of the best in the series.


To get to Rome, they have to cross Frankia. They quickly get into a fight helping a convoy ambushed by what looks like bandits. It turns out that the convoy includes the pregnant Frankish Queen Balthild. Needless to say, she is very grateful, and they escort her to Paris. Here they meet Dalfinus, the Lord of Lyon, and his brother, the bishop, and they agree to stop off at Lyon en route to Rome. Most of the action takes place in Lyon. I won't spoil the story, but it involves a plot to unseat King Clovis and his Queen.

The author keeps to the broad historical story, or what we know of the Frankish Merovingian realms at this time. Wilfrid later became a saint, which given his actions in the book, will come as something of a surprise. His story is told in the Life of St Wilfrid. Queen Balthild appears to have been a special character in her own right. What we today know as France was split into smaller kingdoms: Austrasia, Neustria, Burgundia, Aquitaine and Septimania. Aquitaine was ruled independently and was often quite detached from its Frankish overlords. Septimania was allied to the Visigothic kingdom that stretched across the Iberian Peninsula.

This is historical fiction in the Bernard Cornwell mode. Plenty of violent action and strong characters, but with an underlying morality tale. The bad guys usually get their comeuppance, typically at the point of Beobrand's sword. Great stuff, and I am looking forward to the next book when they resume their trip to Rome.

I have yet to get any Franks, but these later Saxons and Vikings are not far off.


Thursday 15 December 2022

Border Wars

 Border Wars is a 28mm border reiver skirmish wargame. It was a Kickstarter from Flags of War, and it should be available early in the New Year to purchase as a game. Iain is taking a well-earned Christmas break!


In the basic game, you get the rulebook, cards and tokens. Plus, a box of foot figures and a box of cavalry figures. In addition, there were some stretch goals, with additional figures, which I assume will be available to purchase at some stage, along with other expansions to the system.

This skirmish game is aimed at between 8 and 20 models per side. So, while it is a specialised bit of history, it isn't too expensive to buy into. The history is outlined in the book, and it involves families on both sides of the Scottish/English border in the 16th century. This was a lawless land, although some rules were resolved by march wardens. A typical action would involve a family raiding another, reiving their cattle and other goods. The law allowed you to cross the border to get it back within six days if you were attacked. A process known as 'Hot Trod'. There are several histories of the borders and fiction, including Bob Low's triology.

The figures are lovely, and I have painted up most of the foot models. My only criticism would be the need to assemble the cavalry horses, which are resisting the best efforts of my Superglue. I have a pretty low tolerance when it comes to assembling figures, and I struggle to see the reason as it adds nothing to the pose. However, I already had some cavalry from another project, so it's not a problem.

The rule book is a lovely piece of work illustrated by Peter Dennis. It takes you through the setup and how to create your family. Then the playing rules and six scenarios. Finally, a bit more about the border reivers and their legacy. The rules are straightforward and come with a QRS. The author is a member of our wargame club, but I have only needed to ask one question so far.

For the play-through, I set up a simple scenario with a raid on a typical Pele Tower by mounted raiders. The defenders are on foot. This is played on a three-foot square mat.

You get a card for each character, which comes with the starter set, and more can be downloaded from the website. Typically these include a leader, one or more heroes, and the remainder are soldiers or civilians. In addition, you draw heroic actions and special ability cards for your leader and heroes. 

Each figure has to be activated, and then they can carry out two actions, with some limitations. The card has all the game statistics for the character, and you can use them to place counters that show wounds, reload, etc. A range of different dice are used, but a four or more is a pass. This is a neat way of giving better-quality characters a better chance of doing what you want them to do while avoiding too much page-turning.

The reivers didn't go in for a lot of shooting, although there were a few pistols, bows and caliver muskets. If you pass the activation, the shooter throws the number of dice for that weapon, and then the defender rolls the defence dice. Here the bowman on the left shoots at one mounted reiver. A bow gets three D6, with a +1 modifier for mounted, which was two hits. The reiver has a shield, so he saves on 3 rather than 4, so he survives.


Close combat is pretty similar, except you start with a roll-off. Here you can see a leader's advantage over a soldier with a standard dice. This should have been a D10, as you use attack dice even when being attacked. Either way, it wasn't enough, so the soldier got to use his weapons, followed by defence rolls as per shooting.


This combat shows the use of heroic action cards. This one allows the attacker to shoot when he attacks. He missed but won the close combat.


And this one shows the use of a special ability card.

If a melee continues, as in this clash, other figures can pile in, resulting in an outnumbered modifier. There are only a handful of modifiers which speeds up play.

The defenders drove off the reivers in this game, and the civilians were not called upon!

I enjoyed this game as a distraction from my bigger projects. I will play more and look forward to using them in other period actions. There are rules for carrying off livestock or capturing people, which all add to the colour of this period. I have some Landsknechts somewhere who made an appearance in the borders.

Sunday 11 December 2022

The Wallace

 The latest book in my re-read of Nigel Tranter novels is The Wallace. This is Tranter's story of one of the most iconic Scottish heroes. The younger son of a minor landowner, he raised a rebellion against the English occupation of Scotland, defeated the English army at Stirling Bridge, invaded northern England and became the Guardian of Scotland. His downfall came after defeat at Falkirk, after which he went to Europe on some ill-defined mission and, on returning, continued the rebellion before being betrayed and then executed in London.

While, as usual, Tranter follows the historical timeline, the details of his life are sketchy. There are no contemporary accounts of his life, the first coming eighty years after his execution. This gives the novelist a broad scope to describe the actions he led. Not that he drifts off into the fantasy that was Mel Gibson's Braveheart!

Most of the story focuses on the many small raids he conducted across Scotland before the Battle of Stirling Bridge in 1297. We don't have the details to back these up, but Tranter gives a realistic flavour of the sorts of actions he led. After Stirling Bridge, he was pitched into a leadership position he had no training for, without any meaningful support from the nobility. The nobles abandoned the field at Falkirk in 1298, leaving the Scottish schiltrons painfully exposed to English and Welsh archers.

While there is some evidence that Wallace went abroad after Falkirk, Tranter uses a considerable licence to describe Wallace's campaigns leading French forces at Bordeaux. He almost certainly went to Rome to plead Scotland's case to the Pope, and he may have gone to Norway, a trip Tranter ignores. Wallace was probably not best suited to diplomacy.

Tranter captured Wallace's uncompromising nature in a period when the nobility was prepared to compromise their positions when it was expedient to do so. Modern nationalism played no part in their calculations. He is more sympathetic than most historians in his treatment of Bruce. He even has him rescuing Wallace at Falkirk, which is unlikely. Wallace remained loyal to King John, which would not have endeared him to Bruce. 

Wallace was executed as a traitor to a King he never swore fealty to. Yet, he remained true to his almost unique code of honour. So, while he failed to achieve his objectives, he should at least be remembered for that.

Some of my schiltrons of the period in 28mm


Saturday 10 December 2022

Potemkin

 Prince Potemkin is one of the most fascinating characters to emerge from Russian history. He popped up in my reading of Alexander Mikaberidze's Kutuzov biography and in topical stories. He founded the Ukrainian city of Kherson, and the Russians apparently removed his bones when they fled. The Kinburn spit, a tiny headland at the mouth of the Dnipro (Dnieper) river, has been described as having "enormous strategic importance" in the next phase of the Ukraine war. It was in Potemkin's day, although then he was fighting the Ottomans. He also colonised Crimea, which is presumably why Putin was keen to grab his remains.

All of this reminded me that I had a copy of Simon Sebag Montefiore's biography on my bookshelves. I had dipped into it but never read it cover to cover. Russia is a big country, and books about it are correspondingly long! So, it has taken a while, but worth the effort.

Grigory Potemkin was born into a military family in the village of Chizhova on Russia's western borderland. His father was a Colonel, although it has been suggested that he might have been the by-product of his Mother's affair with a senior civil servant. As the author beautifully puts it, 'One simply has to confront the prosaic fact that, even in the adulterous eighteenth century, children were occasionally the offspring of their official fathers.'

I hadn't fully grasped the military side of his career until I read the Kutuzov biography. Potemkin is famous for being the lover (probable husband) of Catherine the Great. Still, I had yet to fully appreciate how long the romance survived and how he effectively ruled as a co-Tsar, particularly in southern Russia. I must stop watching Netflix/Prime TV dramas! He served in the Horse Guards and was part of the coup that brought Catherine to power, later supplanting the Orlovs. Although being beaten up by the Orlovs and losing an eye is probably a myth. 

Needless to say, I enjoyed the chapters on the Russo-Turkish Wars the most. These include the epic sieges of Ochakov and Ismail. It was here that he made his name as a military commander. He was personally brave but became more of an effective military administrator and strategic thinker than a great battlefield commander. He brought on Suvorov and Kutuzov, so he also had an eye for talent. He also encouraged several Brits to come to Russia and was the leading Anglophile at the Russian court. Better not mention that to Putin!

His most long-lasting achievements were the Russian colonisation of the south. The scale of the conquests and city building was staggering in only 15 years. I have to confess that I have used the phrase 'Potemkin Villages', only now to discover it is a myth. Western observers simply could not grasp how he could achieve so much. I have mentioned Kherson, but also Sebastopol, Nikolaev and many more. This led to the creation of the Black Sea Fleet. He also loved the Cossacks, rebuilding the Zaporogian Host and putting them at the heart of the Russian army. 

He populated the lands he conquered with people from many countries, including criminals emptied from British prisons. We should remember that these 'criminals' could have been convicted for minor crimes by today's standards, and this approach didn't harm Australia much. Recruitment from abroad was not uncommon in the eighteenth century, and a squadron was commanded by John Paul Jones and others by Royal Navy officers. However, he did turn down a certain Corsican called Napoleon Bonaparte. Oh, how history turns on small events! He always had an eye for the classical, and for a brief period, he had a unit of Amazons wearing skirts of crimson velvet, with gold lace and white Turbans, all armed to the teeth. That is one wargame unit I must have! 

Potemkin died at the age of 52, looking out over Bessarabia. The book's epilogue deals with his legacy, used and abused over the centuries since his death. A legacy that has to be seen in the context of his partnership with Catherine, an unparalleled marriage of love and politics coupled with immense achievements.

This is a fabulous book about a great historical figure.

For the wargamer, my immediate reaction was to dust down my 6-8mm Seven Years' War Russian army. However, the great man wasn't satisfied with the standard Russian uniform, so he designed his own. In particular, his infantry had the distinctive 'Potemkin helmets'. A couple of Russian firms do this, but of course not accessible at present. The Facebook group for the SYW helped point to a few other options, but primarily dead ends in the smaller scales. So, it looks like the North Star 28mm range.

Friday 2 December 2022

Tannenberg 1914

 This is the latest Osprey Campaign book covering the destruction of the Russian Second Army at Tannenberg in 1914 by Michael McNally. The naming of the battle as Tannenberg was a political decision, resonating with the defeat of the Teutonic Knights in 1410. But, that was simply a small village on a vast battlefield. 


Tannenberg was one of the opening battles of the war in the east, as the Germans attempted to defend East Prussia. The Russians had split their forces into two, the First and Second armies against the Germans in the north, and the Third, Fourth and Fifth armies against the Austro-Hungarians in the south.


As is usual with this series, you get some background to the campaign, followed by an outline of the opposing commanders. The Russian generals, Rennenkampf and Samsonov, had fallen out during the disastrous Russo-Japanese War, which did not bode well for cooperation in this campaign. The Germans later included von Hindenburg, the classic Prussian Junker, and his right-hand man Ludendorff. 


The Russian Second Army under Samsonov included five corps and two cavalry divisions. The First Army under Rennenkampf had four corps and four cavalry divisions. Each corps had two infantry divisions of two brigades, with two four-battalion regiments. The First Army would consist of some 176,000 infantry, 23,000 cavalry, 408 machine guns and 696 pieces of artillery. Samsonov’s Second Army consisted of 178,000 infantry, 18,000 cavalry, 384 machine guns and 636 artillery guns. All in all, the Russians would field a force of just under 400,000 men. A German corps was similar to its Russian counterpart. After transfers to the west, they had four corps in East Prussia. The book includes a detailed ORBAT.


The Russians operated from occupied Poland and Lithuania, which required troops to defend lines of communication. In contrast, the Germans were fighting on home soil. However, the German plan relied on knocking out the French, allowing troops to be redeployed to the east. The failure of the Schlieffen Plan in the west meant they would have to fight a two-front war.


The book gives a detailed account of the Russian invasion and how the Germans countered it. Understanding is helped through excellent maps in the Osprey style. The big picture is of Russian failure, but they fought well in several battles that constituted the overall campaign. It was the projected abandonment of East Prussia that led to Hindenburg and Ludendorff's appointment to command the German forces. For both sides, the initial clashes of the campaign in East Prussia would prove to be a sharp lesson in the realities of modern warfare. 


The outcome was an overwhelming German victory. From an initial strength of a little under 200,000 men, the Russian Second Army had lost an estimated 50,000 killed, 30,000 wounded and up to 90,000 prisoners, together with up to 500 pieces of artillery. Against this, the German records show 1,891 killed, 6,579 wounded and 4,588 missing from an initial strength of almost 155,000 effectives. 


After the campaign, the Germans recognised the need to reinforce the eastern front with two corps. This may have contributed to the German defeat on the Marne, but they helped the Germans defeat Rennenkamf at the Battle of the Masurian Lakes on 7-14 September. 


This book has all the details the wargamer needs to refight the battles on the tabletop. While there are some decent colour plates, you need the relevant Men-at-Arms titles to paint the units. Given the scale of the actions, Bloody Big Battles is a good rules option.


Some of my Russian 15mm figures of the period.

Sunday 27 November 2022

Battleground show 2022

 I made my first visit to the Battleground show in Stockton-on-Tees yesterday. It will not be the last. The venue is Durham University's Queen's Campus, part of a regeneration site in the old canal basin. It is near a train station, has plenty of car parking outside, and the hall is large and bright. The catering was fine, supplemented by a cupcake stall, which was superb.

What really impressed me was the balance of activities. 24 games, half of which were participation together with 30 traders, the well-known as some new ones to me. I bought more stuff than I have at a show for a long time. They also had five reenactment societies, from the East India Company to the Spanish Civil War. I also met the historical novelist Griff Hosker at one of them. There were a couple of presentations from a local historian of the Spanish Civil War. I only made one, but he had done a tremendous job researching the local guys who went to Spain in 1937. 


The games were a good mix of big display games and interesting participation ones.

Vicksburg

Bautzen 1813

Vietnam in 28mm

Monty's attack. A different way of tackling the desert war.

Wellington in India - 28mm.

Pilgrim's Progress. Lion Rampant medievals.

Pavia 1525 in 28mm

Barnard Castle. No eyesight checks are required!

It was a four-hour drive for me but definitely worth the effort. I stopped off at the Sunderland Aircraft Museum on the way down, which broke up the journey, and I stayed overnight nearby. In addition, there is a Royal Navy Museum at Hartlepool, which I will do next time. Many thanks to Pendraken for organising this show.


Friday 25 November 2022

North East Land Sea & Air Museum

 On my way to the Battlefront Show tomorrow, I visited the North East Land Sea & Air Museum (NELSAM). It sits on the former RAF Usworth and Sunderland airport site, next to the massive Sunderland Nissan factory, and comprises the former Aircraft Museum (NEAM) military vehicles collection. The North East Electric Traction Trust (NEETT) is also based on the site.

RAF Usworth was a fighter and training base from 1916 until it was taken over as Sunderland Airport in 1962. In WW2, it defended industrial Teeside against Luftwaffe raids.

There are two small and one large hanger, plus outside displays. The first hanger has a Tornado and a 1916 Morane-Saulnier Type N, which is quite a contrast!

In the main hanger, there is a range of modern-era aircraft, including

Harrier

Sabre (latterly in Greek service)

EE Lightning

Hawker Hunter

The outside displays include the magnificent Vulcan bomber.

A Spitfire

And one of my favourite jets, the Super Sabre. Apparently, this was in French service and somehow ended up in Scunthorpe, where the museum acquired it. It needs a lot of work.


If you are in the area, it is certainly worth a look.

Thursday 24 November 2022

Berezina 1812

 I am on something of a roll with Russian Napoleonics at present. Having finished Alexander Mikaberidze's new biography of Kutuzov, this is the same author's look at Napoleon's crossing of the River Berezina in 1812, a key battle in the retreat from Moscow.


This book is in the standard Osprey Campaign format. So, you get some context, a look at the opposing commanders, their forces and plans, before tackling the three days of the battle, or series of battles, itself. As someone who likes to walk battlefields, I always enjoy the battlefield today chapter. However, this is one battlefield I am unlikely to visit anytime soon due to current events! As always with this series, it is profusely illustrated with excellent maps and colour plates by Adam Hook.


Kutuzov's strategy during the retreat from Moscow was one of harassment rather than seeking a battle. He was happy to attrit the French while shepherding them off Russian territory, ensuring they didn't move south into fertile Russian provinces. Annihilation was possible but not on Kutuzov's agenda. He, of course, appears in the list of Russian commanders along with the leaders of the other columns converging on the river crossing. These include Admiral Chichagov and Peter Wittgenstein, and neither covered themselves with glory in this battle. For the French, we get pen portraits of some less well-known generals, given that half of the marshals Napoleon created fought in the 1812 campaign. These include the 12th Division under Louis Partouneaux and the Polish Josef Zajicek, who took command of V Corps.


The Grande Armée was reduced to about 40,000 men, with few guns and a handful of cavalry by this stage of the retreat. It is often forgotten that the conditions also affected the Russians. Being Russian didn't make you impervious to the snow and ice! Clausewitz, a staff officer in Russian pay, commented that Kutuzov saw his army ‘melting in his grasp’. He carefully nurtured his army, which meant only Wittgenstein’s corps and Chichagov’s Third Western Army would confront Napoleon on the shores of the Berezina. The book provides a full ORBAT for both armies.


The Battle of Borisov pushed the Russians over the river and forced them to destroy the bridge. Napoleon decided to cross eight miles north of Borisov on pontoon bridges. Oudinout made a diversionary attack to persuade the Russians that Borisov was still the favoured crossing point. Russian communications were poor, and they overestimated the size of the French army. The author details the various letters and orders to explain why the Russians failed to contest the crossing seriously. Chichagov became the convenient scapegoat. Napoleon escaped, although thousands of stragglers didn't, but not without heavy casualties. The Grande Armée lost between 25,000 and 40,000 men, the vast majority of them stragglers and non-combatants.


For the wargamer, this campaign offers a range of smaller battles (corps and divisions) that are very playable on the tabletop. There is no shortage of figures for the 1812 campaign, and painting troops in greatcoats is much quicker than the typical summer uniforms. This book provides all you will need.


I dusted down my 15mm Russians for a game at the club last Sunday. My opponent had a British army, historically resulting in a somewhat dubious battle. Although post-Tilsit, both countries were technically at war. The Royal Navy effectively destroyed the Russian Mediterranean Fleet, trying to get home the long way. We used Black Powder for the game, and both my Russian brigades managed to charge across the table quickly, limiting the impact of British firepower. Alexander Suvorov's famous dictum, 'The bullet is a fool, the bayonet is a god', proved correct as my columns ploughed through the thin red line.


Friday 18 November 2022

Military History of Late Rome 395-425

 This appears to be the third volume in Ilkka Syvänne's epic military history of late Rome. Eight volumes so far. This volume covers 395-425AD, which may only be 30 years, but it was a turbulent period. It starts with the permanent division of the Empire into eastern and western parts and ends with the demise of John the Usurper. A somewhat unfair name, as there was no shortage of usurpers in late Rome!


Rome started this period with a military weakened by corruption, undermining its relationship with the civilian population. As the author puts it, 'The officers in general can be considered to have been greedy criminals.' Don't hold back! This didn't stop the Romans from supplying quite large armies. We are generally taught to regard most ancient authors' claims for army size with some scepticism. However, the Romans had a farming surplus, which the author argues could support armies of similar size to the Napoleonic era.

In 397-8, Stilicho launched a major campaign in Scotland. This could have included naval expeditions as far north as the Orkneys. The author argues that the Stracathro-type forts can be dated to this period. He defeated the Saxon, Pict and Irish invaders in a late attempt to defend Roman Britain. We know very little about this period, so getting a new take on these campaigns is interesting. It didn't last long, and he argues that the locals started to organise themselves politically during this period. 

Back in Italy, Stilicho faced the Goths, whose main weakness was an inability to besiege towns. Blockades would work if they had time, but it meant the Romans could defend towns with low-grade levies. Stilicho was not just a capable military commander but a skilled diplomat who managed a delicate balancing act when dealing with the various barbarian forces. When he died, the Goths, led by Alaric, brought about the fall of the Western Empire. The decision of Honorius not to pay for their services and to kill barbarian cavalry commanders fatally weakened the field armies. Rome fell in 410, with the Goths gaining entrance by treachery.

The Eastern Empire took a pragmatic line and even managed to largely keep the peace with the Persians. This was the period when the Theodosian Walls were finally completed, making Constantinople almost unassailable. The weak point was the sea walls because the Romans didn't expect a naval attack. I revisited the walls on my visit earlier this year, and I understand the local authority has been doing a cleanup recently. Türkiye has done some excellent work on Ottoman sites, but they are not always as diligent when it comes to the earlier periods. 

While the west was crumbling, the East Romans had a large army and a strong navy, which delivered military success. Built on the stone walls of Constantinople and the wooden walls of the navy. 

This is a heavyweight military history with a relatively relentless series of campaign narratives. The general reader might find this hard work, but if you are interested in the period, there are many new insights. However, there are plenty of colour plates and organisational detail for the wargamer. Late Roman armies are popular on the tabletop, so this is a likely audience for this book. It's a weighty tome, but the ebook options are good value for money.

Late Roman Barbarian cavalry from my 28mm army.