Welcome to my blog!

News from a wargamer with a special interest in the military history of the Balkans. It mainly covers my current reading and wargaming projects. For more detail you can visit the web sites I edit - Balkan Military History and Glasgow & District Wargaming Society. Or follow me on Twitter @Balkan_Dave
or on Mastodon @balkandave@mastodon.scot, or Threads @davewatson1683

Friday 30 July 2021

HMS Belfast

 I spent most of this week researching in the National Archives and the British Library, two of my favourite institutions and a joy to return after the pandemic restrictions. But man cannot live on archive files and books alone, so I visited HMS Belfast in search of some serious military hardware. I haven't been for many years. The rain was bucketing down, causing some flooding in London, so a ship seemed a good place to be!

HMS Belfast is a Town Class light cruiser, launched in 1938, now moored on the Thames in central London, next to Tower Bridge. It is operated by the Imperial War Museum. She struck a mine early in the war but was repaired and served on the Arctic convoys. Then she helped sink the Scharnhorst in 1943 and bombarded the Normandy beaches on D-Day. After WW2, she saw service in the Korean War. She went into the reserve in 1963 and was saved from the scrapyard before being opened to the public in 1971. I remember going soon after it opened as I was living in London at the time. I was very young!

Her twelve 6" guns are the immediate attraction and 25 crew served in each of the four turrets. It must have been packed and reminded me why, at 6' 2" tall, I wasn't built for the navy. 


The twelve 4" guns make up the secondary armament, along with 16 Bofors AA guns.


You can visit most parts of the ship and all decks, including the bridge. Sadly, not for those with mobility issues, and I bumped my head several times. However, there are a couple of good pubs nearby to soothe the pain!


Well worth a visit.


Wednesday 28 July 2021

Nero Exhibition

 Of all the Roman emperors, Nero comes pretty near to the bottom of the league. Burning Christians, fiddling while Rome burned at his own hands, murdering his mother, poisoning his brother, he even took to the stage to torment the citizens!

He may have lost his head on occasion but it wasn't chopped off. He probably poisoned himself.

Given what we all think we know about Nero, I decided to take in the British Museum's Nero Exhibition while I am in London this week.

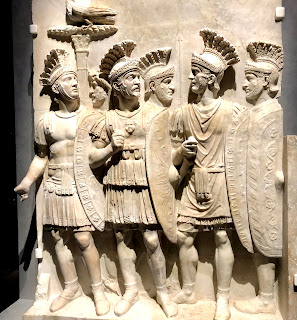
To be honest, the exhibition is not as spectacular as others I have been to at the museum. The Assyrian and the Scythian exhibitions were fantastic. If I hadn't already got a Roman army of the period, I wouldn't be inspired to get one. That is not to say it isn't interesting. Some fine exhibits, including many of military interest. This relief of the Pretorian Guard in particular.


Nero was on the throne while Boudicca's rebellion kicked off, not that he got his own hands dirty dealing with it. There is a decent section on this, with the British and Roman helmets being the high point for me.


A display of gladiator equipment and nice Gladius was about it for me.


The exhibition didn't make much of an effort to rehabilitate Nero, if that is possible. Melvin Bragg had Dr Shusma Malik, who has written a book on Nero, on his In Our Time radio show. She points out that the only surviving sources were written by authors who lived well after his death and had good reason to denigrate the Julio-Claudian dynasty. She also argues that by the standards of Roman emperors, Nero wasn't that excessive. The exhibition highlights his popularity with the masses, if not the Senate. As late as the fifth century, his image appeared on souvenir medallions more frequently than any other emperor. On balance, he was obviously loved and loathed, in what proportions it is difficult to judge.

The British Museum is a staggeringly good visit anyway. My favourite section is the Sutton Hoo finds. I never tire of the Saxon helmet.


Monday 26 July 2021

The Northern Earldoms

 This is a history of the Earldoms of Orkney and Caithness in the far north of present-day Scotland from 870 to 1470AD by Barbara Crawford. It is unusual because, during this period, Orkney was part of Norway and Caithness was part of Scotland. This meant the Earls swore allegiance to two different monarchs for two halves what was administratively one lordship. Some years ago, I visited both these areas regularly as part of my job, and Orkney remains one of my favourite parts of Scotland.

Anyone who has travelled from mainland Scotland to Orkney will understand that the Pentland Firth that separates them can be a rough strip of water. I have been delayed both ways by the weather. However, it wasn't a barrier to communication or settlement in a period when travel was mainly by ship. On the contrary, it was a vital passage for the Vikings who dominated these waters and one that they wished to control both coasts. 

In the Viking era, possibly the most famous Earl was Thorfinn 'The Mighty', sometimes called 'Skullsplitter' or 'Raven feeder'. Either way, you get the message! He pops up in the story of Macbeth, and Crawford confirms that they fought each other, in contrast to Nigel Tranter's fictional story that they were allies. They battled on land in Caithness and at sea off the eastern mainland of Orkney. She also maps Thornfinn's pilgrimage to Rome across Europe, not by the sea, with Macbeth as Tranter postulates.

Despite the joint lordship, the military and administrative structures retained their Norse and Scottish features. The Earls, including Thorfinn, often held sway over larger territories, including the Hebrides off the west coast of Scotland and the Shetland Isles to the north, although the administration was less formal. They would provide ships and men for national campaigns as called for by the kings of Norway and, less often, Scotland. However, both earldoms were a long way from the centre of power in Scotland and Norway, which gave the Earls a bit of latitude. For example, they remained fairly detached from the Scottish Wars of Independence. On occasion, the Earls developed their own foreign policy, which could be regarded as treasonous.

The Norwegians were not big castle builders; in fact, it was unusual for the Norweigian aristocracy to have their own castles. There are a few castles in the Earldoms, but the surviving examples are from the latter end of this period. The introduction of Christianity brought ecclesiastical structures and some territorial disputes. Orkney and Shetland came under the Norweigian archbishopric of Nidaros. The outstanding building is St Magnus Cathedral in Kirkwall. This is a substantial building with a fascinating history. I once represented the caretaker (Jannie in Scots), who also did excellent building tours.

The book takes the reader through the history of the earldoms, highlighting the themes of divided loyalty and the growing authority of kings. This could cause difficulties for the Earls, particularly when the two countries were in conflict. King Hakon's 1263 attack on Scotland and the Battle of Largs is a good example. Fresh in my mind as my wife and I spent a day there last week.

Towards the end of this period, the Earldoms began to retrench as the Scottish kings began to assert greater authority. Sutherland, south of Caithness, was detached in 1200, and the Hebrides were brought into Scotland by Treaty after Largs. As the Viking Earls died out, they were replaced by related Scottish aristocrats, who maintained the dual allegiance but were part of a drift towards Scottish rule. By the late 14th century, the Sinclair Earls included a Chancellor of Scotland, who had substantial lands in southern Scotland. As the nation-state developed, it became virtually impossible to maintain dual oaths of allegiance. In 1472 Orkney and Shetland passed fully to the Scottish crown.

This is a substantial book with a level of detail that will probably only appeal to those interested in the area. Although, I recall quite a few Americans turning up in the archivist's office during the summer to track down their roots. As the Shetland fire festival Up Helly Aa demonstrates between January and March each year, the islands are proud of their Viking heritage. I don't think my liver has yet recovered from a visit during that festival!

28mm Vikings from my collection


Sunday 25 July 2021

The Balkans 1940-41 (1) - Greco-Italian War

 An Osprey Campaign series book with Balkans in the title is usually a must-buy for me. However, there have been several good books on the Italian invasion of Greece in recent years. Unfortunately, this wasn't always so well covered. When I wrote an overview of the campaign in the SOTCW Journal, there was little other than the official history and Mario Cervi's Hollow Legions, in English at least. I had just come back from a visit to the battlefields from the Greek side and later did the same from Albania. 


Pier Paolo Battistelli may not have added much to our knowledge of the campaign, but he has written a very readable account, profusely illustrated with really clear maps. These are the real strength of the book when dealing with a part of the world that will be unfamiliar to most readers.

As with other books in this series, the format is some context and a chronology, followed by a description of the commanders and the opposing forces. There has been a tendency to denigrate the Italian armed forces in WW2, and recent studies have put some balance back into the debate. However, the author points to the poor quality of the troops sent to Albania, many of whom had just been demobilised and were understandably less than enthusiastic about fighting in the Epirus mountains in winter! In March 1941, 4,600 of the 17,000 officers in Albania were replacements and only 800 career officers. These replacement officers were poorly trained in the latest weaponry and tactics. 

It isn't well understood that the original Italian plan was a modest occupation of Epirus. Mussolini decided to expand the objectives to the whole of Greece on 14 October and was told it would require another 20 divisions and consequential delays. Moreover, the Greek army had its own problems, with half the army deployed to face its anticipated enemy, Bulgaria. The Metaxas line facing Bulgaria had modern fortifications, but there were only 50 machine-gun posts in Epirus.

The weather played an important part in the campaign, not least because it meant flying was only possible for short periods. This negated what should have been Italian air superiority. Intelligence was poor, and blue on blue attacks were not unheard of. Once it was clear that the Bulgarians were declining Mussolini's invitation to join in, the Greeks could shift divisions to Epirus, giving them parity of numbers with the Italians. By March 1941, the Italians regained their numerical advantage with 420,000 men deployed in Albania.

The outcome was a reversal of the initial Italian gains, followed by Greek offensives that captured much of southern Albania. That offensive eventually ran out of steam, and the two exhausted armies dug in. Only the German Operation Marita broke the impasse. The various stages of the war are clearly set out in the book with the accompanying maps.

If you are not familiar with this conflict, then this is the book to buy. But, even if you are, it is a useful addition to the library. 

I have wargame armies for this conflict in 28mm and 15mm and have visited the battlefields. Both of which I would recommend. Zagoria is a beautiful part of Greece, and southern Albania is relatively unspoilt by modern tourism.

Greek war memorial and museum at Kalpaki.

Greek army in 15mm

Greek infantry in 28mm

Italian infantry in 28mm


Wednesday 21 July 2021

Revisiting Sharp Practice

 I gave Sharp Practice 2 a positive review when it came out and played several games across the time period. It was certainly an improvement on the first edition. However, I have hardly played it since, and I suspect that's because the various Dan Mersey rule sets for the period have captured my attention. My midweek wargame club (Prestwick) isn't back playing yet because of problems with the venue, so when a member suggested a game at home with Sharp Practice, I dusted down my set of the rules.

We played a version of Scenario 6: The Rescue Mission, using French and British forces of the Peninsular War with 62 points per side.

I am not a big fan of the overly random mechanisms the Lardies use in their rules, but fortunately, my French cavalry leader came out of the pack first and the same for my British opponent. This led to a cavalry clash which the British came off marginally better.


This allowed the meat of the battle to proceed with my two French columns crawling across the table while the British moved into position to block my access to the monastery. I say crawl because Sharp Practice uses variable movement. I have no problem with variable movement as an add on to a basic movement allowance. However, completely variable means infantry can move anything between 2" and 12" per turn by using both actions for movement. Therefore, the chances of completing this scenario, which required me to get to the monastery and back to the bridge (around 10ft), was nil. It also slows up the game necessarily.

The infantry battle used both of the special rules for the British and French, which makes a decent attempt to reflect the tactics of the period. The French won through, and that was largely that as the British morale was down to 0. So, I would have been able to walk into the monastery - if I had a spare evening for dice rolls!


I'm sure we made a few errors and certainly spent a lot of time stuck in the rulebook. It may just be me, the pernickety lawyer, but there is some inconsistent use of language which can confuse. For example, 'withdrawal' and 'broken' are fine, but in Fisticuffs, we have 'thrown back'. I'm sure if I ploughed through the forum, there would be answers, but it irritated me. There were several other issues like this.

We struggled to remember to use the reload and present rules. It results in lots more markers cluttering up the table, and I am not sure it adds much to a game when both sides use the same technology. So I would lengthen the time frame and abstract the process. Otherwise, the firing and combat rules work fine. I was a bit surprised that my skirmishing Voltigiers had the option of standing rather than evading from a British line charge, although I can see circumstances in another time period where 'may' makes sense. You just have to use some common sense and do what the historical troops would have done.

Overall it was a fun game. The Tiffin card didn't break up the game too much, a big problem with the first edition. I do think the rules are unnecessarily complex in places, so I do prefer Rebels and Patriots. However, the narrative play is fun, and we will give it another go.

Friday 16 July 2021

Armies in Southern Russia 1918-19

On the eleventh hour of the eleventh month every year, we commemorate the end of WW1. This new Osprey and others demonstrate that WW1 didn't really end in November 1918. Conflicts involving large armies continued for several years. In this example, Phoebus Athanassiou gives us an overview of the operations and armies that fought in the regions around the northern Black Sea coast in 1918-19. Specifically in Ukraine and Crimea.

The Bolshevik or Red armies included separate Ukrainian and Russian forces. The German occupation forces were leaving but still engaged in places. Against the Bolsheviks were the White forces led by Denikin, supported by intervention armies from France and Greece. This is large scale warfare with Denikin's armed forces totalling some 160,000 men, 600 artillery pieces and 34 armoured trains. The French were quickly bundled out of Crimea, not helped by a naval mutiny, which reflected the low morale of French forces. Probably more war fatigue than Bolshevik agitation. The Allies attempted to hold southern Ukraine cities including Nikolaev, Berezivka and finally Odessa. However, they were pushed back and either evacuated or moved to new defensive lines with Romanian and Polish troops in Bessarabia.

Around 12,000 French troops were committed to the campaign - 156th infantry division, part of the 30th division and the 16th Colonial Division. This meant Algerian, Senegalese and even Indochinese units served in General Berthelot's army. 

I had no idea that the Greeks sent an expeditionary force to the region, particularly given their commitments in Thrace and Anatolia. However, some 23,000 men were sent in two infantry divisions. (10th and 13th). Smaller numbers of Polish and Romanian troops also fought in the region, and were only interested in defending their own borders.

Denikin's army was large and diverse, although the French believed only about 25,000 could be described as operational. Former tsarist officers were fairly reliable but the mass of peasant conscripts were not. Having said that, his army performed much better after this campaign in the Russian Civil War. 

As you would expect from this Osprey series, the book is well illustrated with period photos and colour plates. If you like to wargame an obscure conflict, this book has everything you need.

These Greek Evzones in 28mm would work for this campaign.


Thursday 15 July 2021

The Turkish War of Independence: A Military History

 This is an operational history of the Turkish War of Independence 1919-23 by Ed Erickson. It completes a trilogy of books he has written on the Ottoman and Turkish armies in the early twentieth century covering the Balkan Wars, WW1 and now the Turkish War of Independence, often called the Greek-Turkish War.

Unlike the other excellent recent study of the conflict, Salvation and Catastrophe: The Greek-Turkish War, 1919-1922, this is a military history of the campaigns against the Greek invasion and the other lesser-known campaigns of the war. In fact, I found the chapters dealing with the campaigns against the French and Armenians some of the most interesting.

The book is organised chronologically, starting with the end of WW1and the creation of a Nationalist Army out of the remnants of the defeated Ottoman forces. Salvation and Catastrophe covers the political and diplomatic causes of the war in more detail while Erickson outlines these and cracks on with the Greek invasion and the First Inönü Campaign. This includes the less well-known campaign in Thrace, which successfully ejected Nationalist forces and brought the Greeks close to Istanbul. The narrative then shifts to the war against a wide range of insurgents and the Eastern Front campaigns against the short-lived Armenian Republic and the French occupation of Cicilia. Victory against Armenia led to a treaty with the Bolsheviks, and attacking the overstretched French forces caused them to withdraw to their mandates in Syria and Lebanon. The scale of the battles against the French was a surprise to me. For example, the French force at Gaziantepe totalled 13 infantry battalions and 15 artillery batteries. These victories allowed the Nationalists to shift troops and equipment to the main front against the advancing Greeks. 

The rest of the book takes us through the Greek advances in the Second Inönü campaign, which drew the Greek forces closer to the nationalist capital Ankara. However, Mustafa Kemal (Ataturk) was trading space for time and to stretch the Greek forces, which were simply inadequate for such a huge operation at a time when they were losing international support. The Great Offensive destroyed the Greek armies and forced the remnants to evacuate. This brought the Nationalists facing the British occupation forces guarding Istanbul and the Straits.  This resulted in an armistice followed by the Treaty of Lausanne and the establishment of the Turkish Republic.

While the trenches and barbed wire of WW1 were present, this was a war of manoeuvre in which cavalry played an important role. The larger Nationalist cavalry units were able to outflank the Greeks and interdict their supplies and command structures. During the Battle of Sakarya, the Nationalist cavalry even managed to attack the Greek field army HQ. This was war on a large scale, with armies of up to 200,000 men on each side. Casualties are difficult to assess, but Konstantinos Travlos has a go in Appendix A. The Greeks lost around one-third of their army dead and wounded (over 60,000), with many more taken prisoner. The Nationalists about half the Greek casualties. Civilian casualties were massive with atrocities on both sides, compounded by the population exchanges that followed. 

Erickson argues that the Great Offensive was one of the few successful examples of operational-level encirclements conducted before WW2. He ranks it with Tannenberg and Megiddo in this regard. Such an operation could only be delivered by highly trained staff officers who had been trained in the Ottoman war academy using doctrines learned from the Germans. Kemal, Fevzi and Inönü formed an effective command team, along with Karabekir on the eastern front. Railroads, the weather and the Anatolian geography all helped the nationalist victories.

This is an excellent operational history of the war or arguably wars. Each campaign is put into context, followed by the preparations, and each phase of the campaign is broken down into readable chunks. Then, finally, a conclusion which outlines the outcomes and the key lessons. The reader is left with a clear understanding of the war. Highly recommended.

I tried one of the lesser-known campaigns on the eastern front against the Armenian Republic for the tabletop. From the limited pictures, it seems that the Armenian army had a variety of uniforms and equipment. When you are struggling to arm your troops, nice uniforms are not a priority. So, some civilian dress and former Russian uniforms appear to have been the norm. I used my Russian figures of the period in 15mm, who look far too smart, but even for me, this is a project too far! 

My choice of rules for this period is Bloody Big Battles. The armies were not large. With irregular militias incorporated, the Armenian army was about 20,000 men, and the Karabekir's XV Corps had 15,811 men plus irregular formations. This is quite a small battle for Bloody Big Battles to handle. The Turks attacked the rather too spread out Armenian position by pinning their left and concentrating the attack on the right-wing. They fairly quickly outflanked the Armenian right and rolled up the line. A historical outcome!


Monday 12 July 2021

A Strange Campaign: Madagascar

 I get through a lot of podcasts on my morning walk, but I rarely buy audiobooks. For military history, access to maps is important, and that obviously doesn't work in audio. So, I have made an exception for Russell Phillip's study of the Madagascar campaign of WW2. It is narrated by Henry Hyde, who has a very listenable voice, as those who subscribe to his podcast will know.

Madagascar was a Vichy French colony in 1942, and 250 miles off the east coast of Africa, it was something of a backwater. However, with the Japanese advancing towards India and the Indian Ocean, the colony suddenly appeared on the British radar. It was also on the Cape supply route to the Middle East, so a Japanese naval presence on the island would be well placed to interdict convoys. Its major deep water port, Diego-Suarez, was large enough to accommodate capital ships and had a dry dock. 

This book is the story of Operation Ironclad, the British and Commonwealth invasion of the island. This was a significant undertaking supported by a naval task force that included a battleship, two carriers and 43 other warships. In addition, three infantry brigades, a commando unit and armour, landed in an operation that provided some lessons for the later invasions of Sicily and Normandy.

There were mixed views in the Allied high command over the necessity of invading the island with the Americans opposed. It was a major commitment at a time when there were many other calls on men and equipment. The Vichy government had replaced the island's governor with a Petain loyalist, Armand Annet, who was likely to defend the island with its large garrison. Despite de Gaulle's assurances, there was very little support for the Free French on the island.

The main landing was made close to Diego-Suarez, followed by an advance on the town by land while the defences and airfield were attacked from sea and air. The defensive Joffre Line' hadn't been spotted by air reconnaissance, and they had sufficient artillery to knock out Valentine and Tetrarch tanks. It was left to the infantry and another landing operation to secure the town. The British suffered 109 killed and 284 wounded, as well as nine aircraft and one minesweeper. Admiral Syfret’s report included several lessons learned for future operations. These included that white flags and leaflets should not be employed when operating against French possessions. He dryly noted that “Stories of what the inhabitants did with the leaflets would surprise their originators.” 

Having captured the main port, there was a further debate over the need to capture the whole island. Smuts was in favour, but Churchill was concerned it may be a burden. However, continued French resistance meant that it was agreed to press on before the rainy season would make land operations impossible. The author takes the reader through each of the subsequent operations, which involved further naval landings and fighting over challenging terrain. The King's African Rifles played an important role in these operations and were less susceptible to malaria than the British battalions. They secured the final surrender of Annet, who had dragged the campaign out for six months. 

Churchill summed up the campaign: “The Madagascar episode was in its secrecy of planning and precision of tactical execution a model for amphibious descents. The news arrived at a time when we sorely needed success. It was in fact for long months the only sign of good and efficient war direction of which the British public were conscious.”

This is an excellent listen, although I also bought the PDF version for the maps. You can use Google maps, but some of the place names have changed.

The French were well supplied with artillery and support weapons.  28mm figures from my 1940 army.


Saturday 10 July 2021

Invasion of Cyprus 1974

 My WW2 eastern Mediterranean research inevitably references Cyprus. Although its strategic position remained important, it was just too far away from Axis bases in the Dodecannese to play a key role in WW2 campaigns.  Current tensions with Turkey over oil and gas around Cyprus caused me to look at the events that led to the partition in 1974. My first overseas trip was a school cruise in 1967, which included a stop at Famagusta because the planned trip to Israel was diverted due to the Six-Day War. I remember looking at the UN troops near the old town, keeping the peace between the Greeks and the Turkish enclave.

A quick search on the subject of the Turkish invasion in 1974, or peace operation as Turkey describes it, delivers a vast amount of less than objective analysis from both sides. Although the Greeks are more prolific, in English at least. I quickly read Dylan Casper Jones booklet, 'The Cyprus-Turkey War 1974'. He was a British soldier stationed in Cyprus in 1974 and took part in British operations to protect their bases and related sites. It includes a potted history of the conflict, although it's a bit disjointed in places and not entirely accurate. However, from a 'boots on the ground' perspective, it is an interesting read.


My current reading is 'The Cyprus Emergency' by Nick van der Bijl. This is a narrative history of the island and the campaign against the British occupation, which turned violent in the 1950s. This was led by the insurgency group EOKA, which wanted the island to join with Greece, known as Enosis. Unsurprisingly this was opposed by the Turkish minority, who formed their own militia to defend Turkish areas of the island. The British largely defeated the insurgency, and the Republic of Cyprus was created in 1960. The constitution involved power-sharing between the two communities under President Makarios, but the country was plagued with inter-communal violence. In the 1970s, EOKA was reformed and started a new insurgency aimed at Enosis, opposed by the Makarios government. In 1974 the Greek Junta encouraged a coup by the Cypriot National Guard that deposed Makarios and appointed a pro-Enosis President. The Turkish Cypriots called for Britain and Turkey to intervene as the treaty guarantors. Turkey took this opportunity to invade and occupy the northern third of the island, which resulted in massive population exchanges. In 1983, the Turkish Cypriots created the Turkish Republic of Northern Cyprus, which is only recognised by Turkey.

This is a good narrative history and gives an overview of the military operations in 1974. However, for wargaming purposes, it lacks operational detail. For that, I turned to Ed Erickson and Mesut Uyar's book 'Phase Line Attila', which I have as a PDF, although hard copies can be purchased. 

Erickson writes operational history like few others, and this is the best available study of the invasion I have found. I would have liked a little more organisational detail, but I also found some army lists that plugged the gaps.

For the tabletop, I had planned on using my modern 1/300th scale Turkish and Greek armies. However, the Cypriot National Guard was equipped with a mixture of older British and Soviet equipment. My 1/200th scale Arab-Israeli conflict models fitted better, supplemented by British desert army units. The Turkish army and marines were largely equipped by the USA, while the Cypriots had an eclectic mix of equipment. Marmon Herrington armoured cars fought side by side with T34/85 tanks and BTR-152 carriers. 

I use the Cold War Commander rules for this scale. Unfortunately, there were no army lists on the website, so I created my own based on a reinforced Turkish marine battalion and a Cypriot infantry battlegroup. As in the historical action, Turkish airpower was important, negating the marines lack of heavy equipment.

Once the Turks had captured the port of Kyrenia, they were able to bring in M47/48 tanks who spearheaded a two-stage offensive, which gradually pushed by the National Guard units who had little with which to stop them. The modern Greek Cypriot forces now have a much better-equipped army to face the two Turkish divisions that garrison today's occupied territories. The invasion in 1974 also involved paratroop and helicopter landings as well as naval and air operations. So, there is scope for a bigger project and more than a few 'what-ifs'.

Turkish marines advancing from the right were slow to advance.

They were saved by Turkish F-100 Super Sabres bombing the Cypriot tanks.


The Cypriots briefly held the high ground before a combination of air attacks and artillery destroyed them.

Monday 5 July 2021

The Bulgarian Contract

 This is the story, told by Graeme Sheppard, of how a clever piece of misinformation arguably brought an early end to WW1 and saved many lives. In 1918, there was a common belief in Bulgaria that there was a secret agreement with Germany for a three-year war that came to an end on 10 September 1918. It is argued that this is the basis for the collapse of the Bulgarian army in September 1918, which led to the German High Command recommending that Germany seek an armistice. 

In fact, there was no such clause in the treaty that brought Bulgaria into the First World War on the side of the Central Powers. Instead, the story was likely invented by the Agrarian Party Leader, Alexander Stamboliski, to undermine the ruling Bulgarian Government.

The basis for the book is the story of two junior British officers, Robert Howe and John Cowan, who had been held as prisoners of war in Bulgaria for three years. They witnessed the Bulgarian capitulation first hand and even bluffed their way to Sofia, claiming to take over the city in the name of the British Army. Both officers went on to have long careers in the Foreign Office. Howe wrote about his experiences in unpublished memoirs, and Cowan corresponded with Cyril Falls, who wrote the official British history of the war. The story gets a footnote in the official history and a few references in Bulgarian histories. It is obliquely referenced in Ludendorff and Hindenburg's memoirs as well.

The author argues that Howe and Cowan are strong witnesses for the veracity of the contract. They both independently evidence the creedence given to it by Bulgarians and that its inventor was Alexander Stamboliski based on a brief discussion they had with him. Moreover, they enjoyed an extraordinary degree of freedom among ordinary Bulgarians in September 1918, spoke with them in their own language, ate, drank and did business with them. Finally, so convinced were the pair that the fighting would end that September that they returned to formal custody in expectation of their imminent release.

The contract is not mentioned in detail in the many studies of the period, and Stamboliski never claimed the credit. However, the author gives several credible explanations for this. French and British intelligence did not expect serious resistance from the Bulgarian Army before the Battle of Dobro Pole, leading to the Entente victory in Macedonia. The Bulgarian 2nd and 3rd Divisions collapsed, although the same was not true of the 9th Division facing the British at Doiran. The 9th Division was led by General Vasov, a competent commander who had successfully fought off the previous offensives. 

My 2016 picture of the formidable Bulgarian positions at Doiran

Sheppard makes a convincing case for the existence of the contract. It was probably one of many plots Stamboliski invented from his prison cell, which he had good reasons for not mentioning later. The evidence for its impact is perhaps less strong, although, at the very least, it contributed to the Bulgarian collapse. That collapse certainly formed the basis for Hindenburg and Ludendorff's loss of confidence, following on from the defeats on the Western Front, particularly the Battle of Amiens. It is therefore fair to argue that this shortened the war and saved many lives.

So, it's a good story well told. However, I am not sure it qualifies for a book in its own right. Even allowing for some context, the story of the contract could be adequately told in a journal article. To turn it into a book requires a large amount of padding about the wider war in 1918, which is interesting but hardly new. The knowledgeable reader may want to skip more than a few chapters, but if you are new to the story of how WW1 ended, you will find this content useful.

Bulgarian WW1 infantry in 28mm


Saturday 3 July 2021

The Last Ottoman Generation

 This is Michael Provence's study of the post-Ottoman Middle East and the former Ottoman figures who helped shape it. In the west, at least, our understanding of this period is fixed on the imperial characters like Lawrence of Arabia and the French General Gouraud. The 'line the sand' deal between Britain and France after WW1 defined imperial spheres of influence and fragmented the region into small and manageable national states. A fantasy world of their own invention.


This book takes a different approach from the many national histories of the modern Middle East states. It looks at the region from the perspectives of the post-Ottoman citizens, many of whom did not regard the new order as an improvement. Its frame of reference is not the birth of something new but the death of something old and evolving, arguably even modernising. It studies the commonalities across the region that were clear to all until at least the 1940s.

One of the most interesting chapters deals with how the Ottomans administered the region. The state military and civil education systems and the generations of soldiers and administrators who progressed through it. Sultan Abdul-Hamid made specific efforts to increase the representation of non-Turkish students into the system, and Arabs were conscripted into the army. Modern infrastructure, including the railways and the telegraph system, also played a part in modernising the region and helped to spread new political ideas. They required trained workers, and technical schools were built to train technicians. 10,000 kilometres of railway line had been built by 1918. 

The men who progressed through this system played an important role in the late Ottoman empire and formed an educated military elite, although still outnumbered by career officers who had risen through the ranks and were barely literate. The book gives many examples of the individuals who also went on to play a role in the post-Ottoman region.

Both the French and the British found their administration of the region under the mandate system costly. They tried a range of approaches, from adopting local elites to gerrymandering the boundaries and divide and rule strategies. Separating Lebanon from Syria is just one example. When they failed, they did counter-insurgency operations on the cheap. This often involved the use of air power to bomb and destroy rebel villages. The French mission civilitrice was anything but civilised for those killed or made homeless in these often random punishment attacks. Male villagers were occasionally gathered together and executed randomly.

The Turkish recovery in Anatolia led by Mustapha Kemal had limited benefits for those trying to emulate it in the Middle East. Ottoman Arab officers played a role in several insurgencies, but they got little support from the new Turkish republic. Former Ottoman Turks ridiculed the Arab leaders for abandoning the Ottoman Empire in favour of the British. They were focused on creating a Turkish state, not reinventing the Ottoman Empire. Other Ottoman-trained political leaders made political efforts through representations to the League of Nations to make a case for self-representation. These had limited success, and the notional independence of Iraq, and later Syria left real power in the hands of the British and French governments. 

Ottoman rule may have delivered an imperfect system of rights and representation, but most of the population viewed it as more legitimate than the colonial regimes that replaced it. For the colonial powers, the occupations were expensive and provided few benefits. Their mandates gave the region its most enduring conflicts, most notably in Israel and Lebanon, and more recently in Iraq and Syria. The author accepts that former Ottoman army officers were as authoritarian as the colonial mandates, but those peoples who were most able to determine their own destiny have survived the events of the past century the best.

This is a different analysis of the post-Ottoman Middle East from conventional studies. All the key events are covered chronologically, but viewed from a regional perspective. Well worth a read. 


French Senegalese infantry (28mm) were deployed in interwar Syria.

Thursday 1 July 2021

Galava or Clanoventa - Ambleside Roman Fort

 I am on holiday this week in the English Lake District. Mostly fell walking while my wife paints and daughter drags her partner around various activities. The Lake District is one of my favourite places on earth, but it is renowned for its scenery, not its history. However, our flat just happens to be very close to the site of a Roman fort. Not that my wife believes anything like this just happens!

The ruins have been tentatively identified as Galava, which is mentioned in Roman records, although others think it was Clanoventa. The fort guarded the Roman road from the west coast and another road south to the fort at Kendal. In 2016 it was reported that technology had revealed a Roman road running north from Ambleside fort to Carlisle and Hadrian's Wall. The fort is built on the edge of Lake Windermere, so, it is likely supplies were also brought in by boat. The Romans were often ambushed in this mountainous terrain, so much so that they marched across the fells rather than go through the lowland woods. A fell is called High Street to reflect this use.

The original first century AD fort was probably a mound with wood palisades. It was later converted into a rectangular stone fort, with four gates and towers at each corner. The information board gives an artist's impression.


It was occupied until at least 365AD and was attacked on several occasions. A tombstone found at Ambleside bore an inscription that translates as "killed within the fort by the enemy".

There isn't a great deal to see other than a few wall bases. However, the National Trust has put up several useful information boards. I wouldn't make a special trip, but worth a look if you are passing.


We also went to Levens Castle near Kendal. Mostly gardens for my wife, but there is quite a lot of Napoleonic interest as a former owner was an ADC to Wellington at Waterloo. Items include Napoleon's saddle from the Egypt campaign.

And some Imperial Romans of the type that would be based at Ambleside.