Welcome to my blog!

News from a wargamer with a special interest in the military history of the Balkans. It mainly covers my current reading and wargaming projects. For more detail you can visit the web sites I edit - Balkan Military History and Glasgow & District Wargaming Society. Or follow me on Twitter @Balkan_Dave
or on Mastodon @balkandave@mastodon.scot, or Threads @davewatson1683

Tuesday, 17 October 2023

Napoleonic Austrians

I have completed my Austrian Napoleonic project in 28mm, the final piece in the jigsaw of units to refight the battles I describe in my book, The Frontier Sea. 

The Austrians were a bit of a nuisance as they had several uniform changes during the Napoleonic wars. I have the earlier uniforms in 15mm, so for this project, I went for the post-1809 uniforms. Essentially a shako instead of the distinctive helmet.

This is a force for the small scale actions I describe in the book, for which my preferred set of rules is Rebels and Patriots. So the starting point is two units of line infantry.


The most common units on the border with the Ottomans were the Grenzer.

The Austrian Jagers with my favourite corsehut hat.


Of course every army needs a general, even if a General Staff officer is a bit much for this modest force! And a six-pounder gun, heavy enough for some punch but light enough to get over the very poor roads.


And finally, although not Austrian, the Ragusa scenarios in the book need Ragusan militia.


The militia are adapted from the new Perry Ottoman irregulars. The line infantry are Front Rank, recycled by Colonel Bill. I think the rest are Perry Miniatures. There wasn't much cavalry in Dalmatia as it is not really cavalry country. However, I might add a small Hussar units at a later date.

For uniform details, I would recommend Philip Haythornthwaite's three volume series of Osprey MAA. Supplemented by David Hollins' Osprey books on the infantry and artillery.


Sunday, 15 October 2023

Sharpe's Command

 A new Sharpe novel is rare and a sign that my productivity this week would take a hit! This novel is based on the less well-known Almaraz action of May 1812 (a bridge over the Tagus in western Spain), led by 'Daddy' Hill. A rare example of a detached command under Wellington, who trusted Hill more than his other generals. Sharpe is a Major at this stage of the Peninsular War, and his small band of riflemen are tasked with scouting the French positions.

Due to captured dispatches, Wellington knew how vital the bridges and forts were to Marmont. It was a key supply base and how he could join with Soult. Wellington dispatched Hill with 7,000 men (two British and one Portuguese brigade with cavalry support) to destroy the forts and bridges. 

Sharpe is supposed to liaise with a guerilla band, which doesn't quite work out, and he gets more involved with the French than any scout is supposed to. Particularly as the Hill's advance was supposed to be a secret. However, I won't spoil the story.

The map below is taken from Oman (A History of the Peninsular War, Volume V) and shows the castle at Miravete, which blocked the direct route to the river.


Hill masked Miravete and sent Howard's Brigade (50th and 71st Foot (Highlanders)) to bypass this strong position, although this route was impassable for artillery. The French garrison amounted to around 1000 men, including the 4th Etranger (Prussians), 39th Line and two companies of 6th Light, commanded by Colonel Aubert. Without artillery, the British were forced to attempt a capture of Fort Napoleon by escalade, always a challenging proposition, and they faced some additional challenges, which I won't spoil the story by explaining. Sharpe and a Highland regiment is an unbeatable combination!

Cornwell keeps pretty close to the historical outline, with Sharpe and a fictitious band of guerillas inserted, of course. This is all classic Sharpe, and fans will love it. 

After reading this, there was no competition for the Sunday game. We used Rebels and Patriots to refight one scene from the action. Sharpe is attempting to hold the old bridge near Almaraz with some guerillas led by his wife. He is attacked by a much stronger force. You won't find this action in Oman or elsewhere, but it is a classic Sharpe fight. 

Rifles on the right of this photo, partisans on the left, Harper with a small unit in reserve. Four units of French line and a skirmisher unit attacking.

The French break-in and Sharpe retreats. This is unheard of in a Sharpe novel!

Harper to the rescue. One blast of the volley gun and the French retreat. It took another two rounds of fire before he drove off the other French unit.


If you want to read more about the historical action, Robert Griffith's book 'At the Point of the Bayonet' (Helion, 2021) includes the battle in his study of two of Hill's battles. 

Friday, 13 October 2023

The Dutch-Indonesian War 1945-49

 This is a new Osprey Men-at-Arms book by Marc Lohnstein looking at one of the less well-known wars of liberation after WW2.

Dutch rule ended in the Netherlands Indies with the Japanese invasion in 1942. Indonesians participated in the Japanese administration and declared independence after the Japanese capitulation in 1945. A violent war ensued as Dutch forces attempted to reassert control over four years. Like other colonial powers, the Dutch discovered that there was no going back to colonial rule, and they were forced to recognise an independent Indonesia in 1949.

The author outlines the political background and the substantial Japanese occupying forces in 1945. A staggering 290,700 Japanese troops and civilians were based mainly in Java and Sumatra. The British Admiral, Lord Louis Mountbatten, was responsible for accepting the Japanese surrender and organising the return of the Dutch colonial administration. He used an Indian and an Australian corps for the task. They quickly realised that the Declaration of Independence had changed the reality on the ground.

The new Dutch governor, Dr Hubertus van Mook, sought to reach an agreement to reorganise Indonesia as a federation of semi-autonomous states, with a representative of the Dutch Crown as head of government. However, while this had some support from moderate politicians, the war had ended the credibility of the Dutch administration. 

The Indonesian forces reflected the different ethnic groups in the countries and were mainly armed with captured Japanese weapons. Cut off from supplies from abroad, they later relied on capturing Dutch weapons. They had some armour and a handful of aircraft and ships.

Dutch troops took over from the British in 1946. They were initially organised into seven brigades, each around 3,500 strong. By the end of 1946, they had around 146,000 men in Indonesia, made up of local recruits and Dutch conscripts, armed with surplus Allied equipment. They had limited air support, including Kittyhawks, Mustangs and B-25 bombers.  

The Dutch strategy envisaged using fast mobile columns to penetrate liberated territories. This was based on the view that support for the new Republic would be limited to the young and the intelligentsia. A similar mistake to the French and other colonial powers. Offensives were generally successful, but pacification was much more difficult. The war became a significant drain on the Dutch economy, just as the Cold War began in Europe. The UN called for a negotiated solution, and the US threatened the withdrawal of Marshall Plan aid. Their opponent, Col Nasution, would concede that ‘The reason that the Dutch were finally willing to withdraw their forces... was not because they were defeated by our army, but because... there was no longer any hope for them to destroy the Republic.’

As usual with this series, there are decent maps, ORBATS and colour plates of the main troop types. For wargamers, the Dutch had a mixture of Allied uniforms, and early Vietcong models would work for the Indonesian irregulars, with more traditional colonial uniforms for the Republican Army. I do like an obscure conflict, but this, while interesting, is a step too far for me. However, Vietnam gamers may find something of interest and, in the smaller scales, could get away with some common troop types.

Thursday, 12 October 2023

Darkest Hour

 This is another in James Holland's WW2 fiction series. While I haven't been reading them in chronological order, this is the last one for me and covers the France 1940 campaign.

Our hero, Jack Tanner and his squad are back from Norway and assigned to guard RAF Manston and the surrounding coast. This series is pretty much Bernard Cornwell's Sharpe set in WW2. Here, we have an incompetent company commander, a decent Lieutenant, and a crooked CSM. The class system runs through the story, only marginally improved from the Napoleonic Wars.

Tanner starts by upsetting the troops involved in the theft of military supplies, a theme throughout the story. Then, the Germans invade France, and the unit is sent to join another battalion in Belgium. This series focuses on small unit actions, which are very well described. However, the bigger picture is addressed, with occasional chapters covering Lord Gort's HQ and his challenges with the French. Holland's take is more sympathetic than the history books to Gort - justifiably, in my view.

We also glimpse the other side of the hill in the form of an SS major commanding a reconnaissance company, who regularly bumps into Tanner and his squad. Needless to say, Tanner, very Sharpe-like, tends to do his own thing. The unit takes part in the retreat from Belgium and then the Arras counterattack, spearheaded by one of my favourite WW2 tanks, the Matilda.

I won't spoil the story that ends up in Dunkirk, with Tanner's unit in the rearguard. Spookily, I was reading this chapter the night before Partisan at the weekend, and there was a game based on this action at the show. And very good it was too.

I really enjoyed this series and hope James Holland will finish Jack Tanner's war. For now, the latest Sharpe novel has just arrived. Getting any work done this week will be a challenge!

Sunday, 8 October 2023

The other Partisan 2023

 From not having attended any of the Newark shows, I have now been to all of them this year. I hadn't intended to go again this year, but my brother organised a few days of golf with pals near Leicester, so it would have been rude not to go on the way.

Partisan has a reputation for high-quality games, and it didn't disappoint. All the usual traders were also there, and I picked up Mig Alley for Blood Red Skies, some cowboys, various WW2 types for the Cyprus project, paints and other stuff. 

There were a couple of games that even impressed my non-wargaming daughter. One was a giant game of Risk. The board game will never feel the same again.

The other was a Star Wars game. She tells me it is from Rogue One, which means nothing to me.

If there was a theme this year, it was castles. In all shapes and sizes, the 3D printers have been very busy.


Graus 1063


Sharp Practice 1860s

Others that caught my eye was a giant Cold War game in Germany. The planes were particularly good.

WW1 trench warfare is challenging to do well, but this was impressive.


Not much Balkan interest, I am sorry to say. However, this micro 28mm game of the Hungarian Revolution was interesting.


And somewhat spookily. My current bedtime reading is James Holland's WW2 fiction series. His hero, Jack Tanner, was at the defence of Calais in 1940 in last night's chapter, and there was an impressive game doing just that battle.


So, it was well worth the detour and thanks to the organisers for another great show. I had lots of interesting chats, and spending a day at a show doing whatever I fancy is nice.

I should find a golf range tomorrow morning to tune my rusty game, but I am staying just down the road from Bosworth. I haven't been for probably 40 years, and they have moved the battlefield in the interim!


Saturday, 7 October 2023

South Yorkshire Aircraft Museum

 I am en route to the Other Partisan wargames show on Sunday. Looking for a suitable stop-off point, I realised I had never been to the South Yorkshire Aircraft Museum at Doncaster. This is another of those wonderful museums run by a dedicated band of enthusiasts. 

They don't have a lot of space, so the typical outside plane exhibits are limited. Still, a decent collection, including:

Lynx helicopter.

Hawker Hunter. This was an ex-Danish Air Force one.

Aermacchi MB 339. Captured at Port Stanley airfield.

RAF Harrier that served in the Falklands campaign

The Falklands War is ever present in this museum with a dedicated area and plenty of exhibits as well as aircraft.

Including this exceptional 1/96th scale model of HMS Hermes.

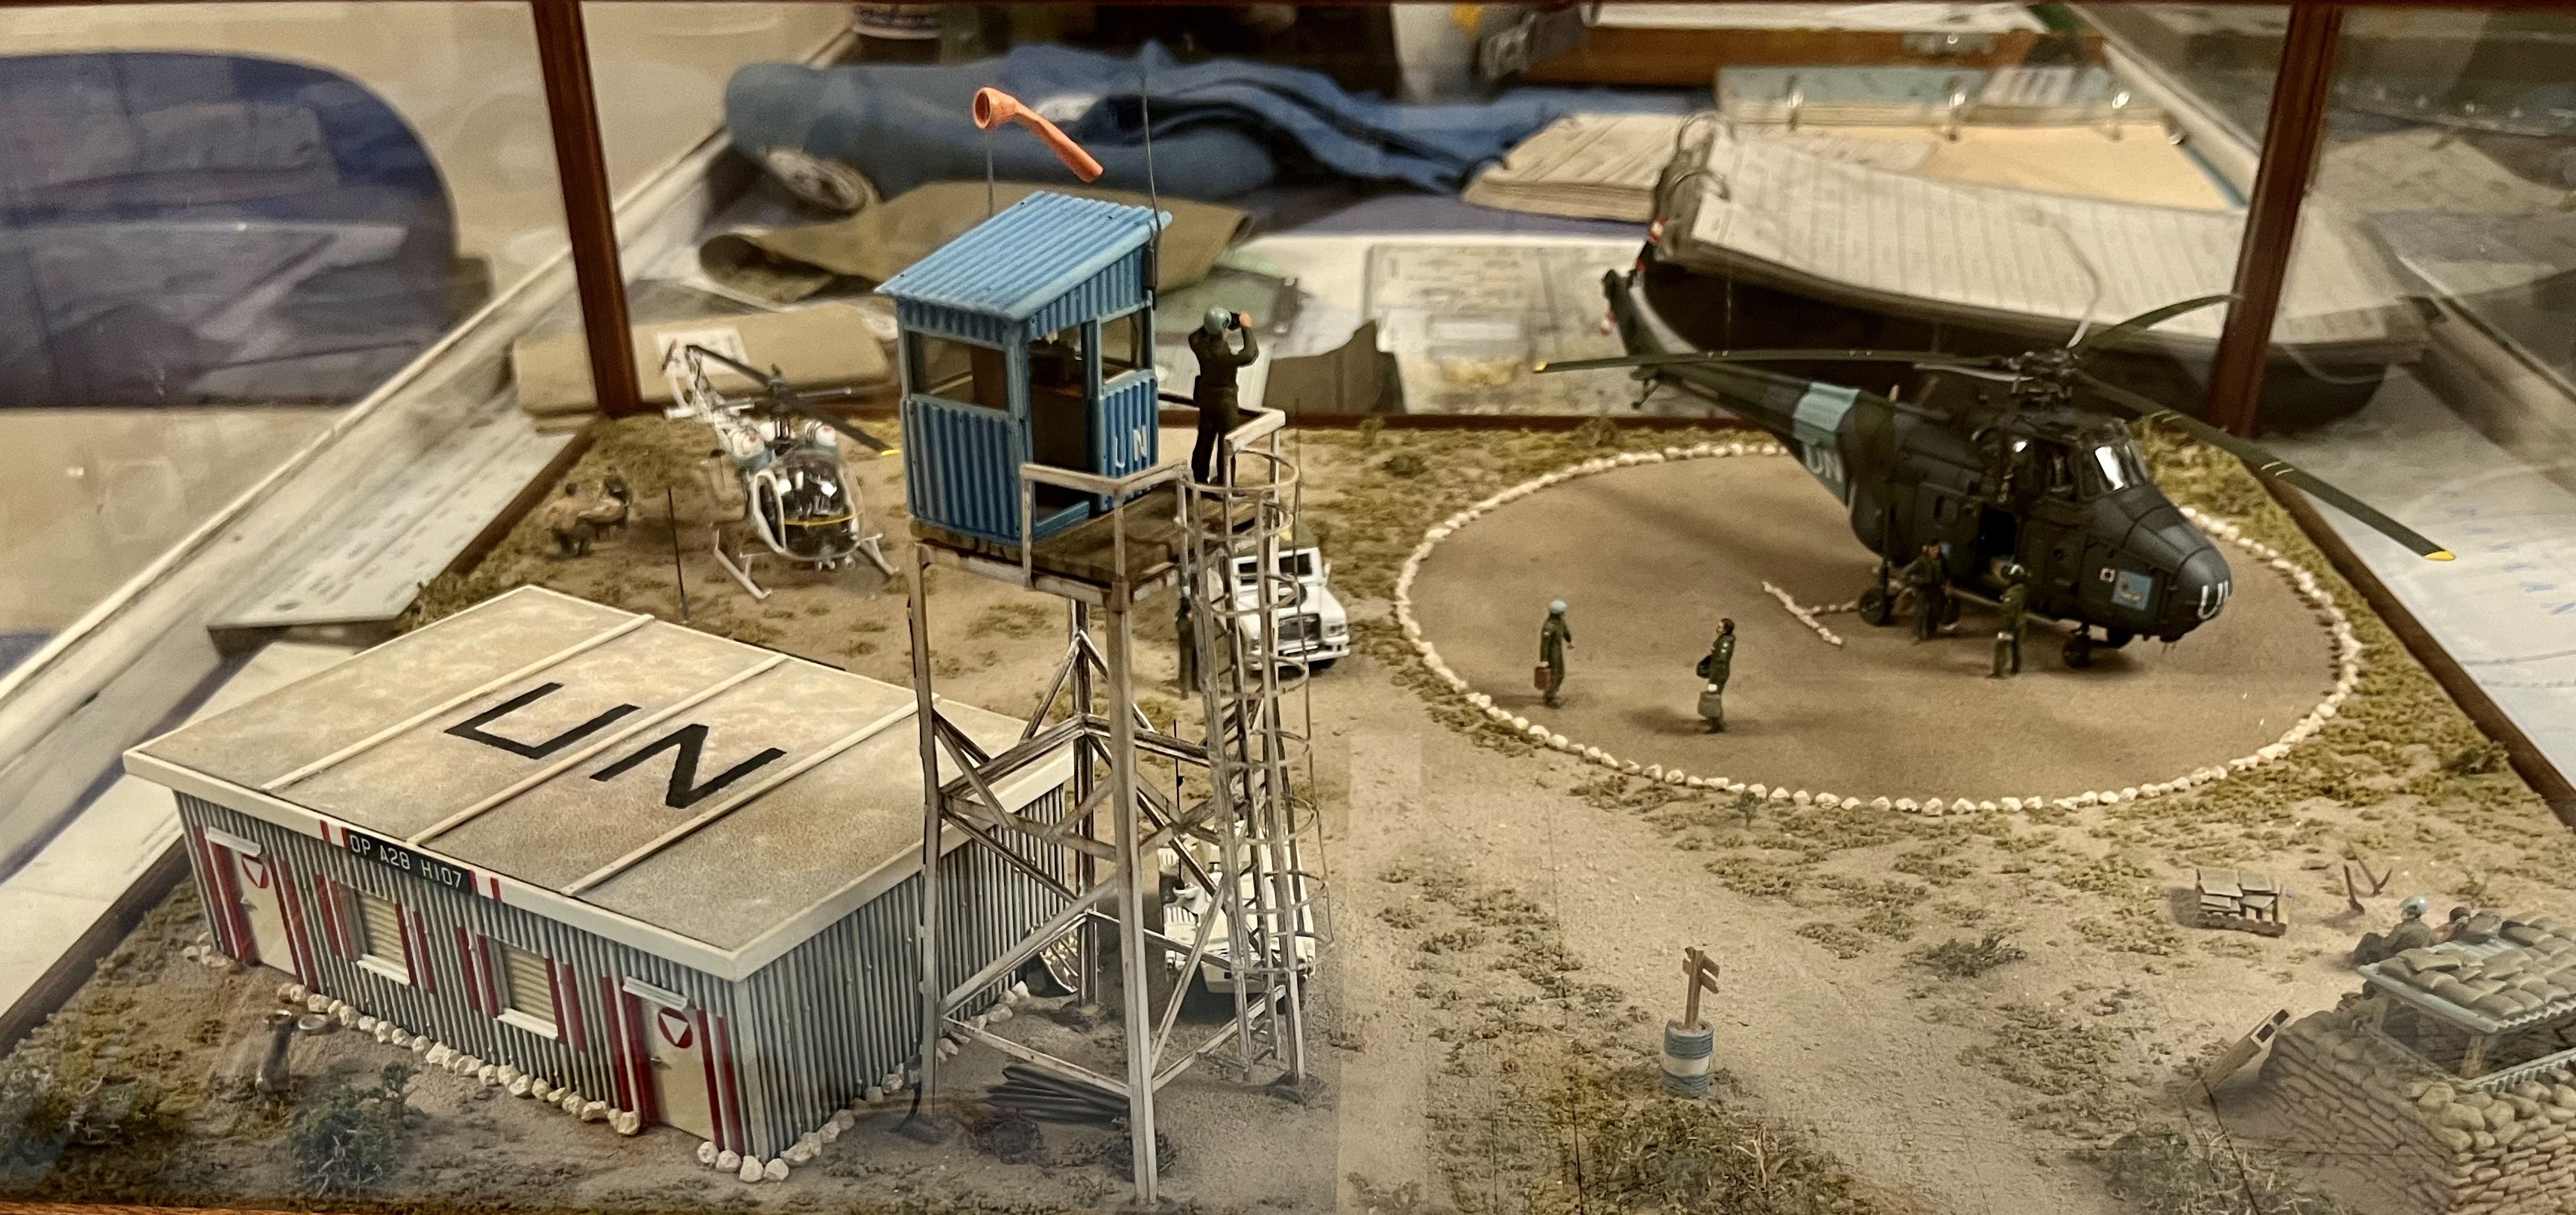
There is a helicopter preservation group based here, so there are plenty of them and fixed exhibits as well. Including an interesting Cyprus display, even if an error or two has crept in.

Cyprus UN helicopter base diorama


Bristol Sycamore. The first RAF helicopter.

There are a few ground weapon displays as well.


And a base operations room.


Finally, just about every Canberra variant you can think of.


Even a bit of the Balkans with this Romanian WW2 IAR fighter!


I spent a couple of hours there. Plenty more to see, and if you are in the area, please support them.


Tuesday, 3 October 2023

War of the Stray Dog

I do like an obscure conflict, although I won’t turn this one into a book! I was looking for a small-scale battle for a midweek game over Zoom with a friend from Greece. When researching something else, I had come across the Incident at Petrich and thought it might make an interesting game.

The Incident at Petrich in October 1925 was a border clash between Greek and Bulgarian forces near the town of Petrich, which is in modern-day Bulgaria. The incident had its roots in territorial disputes and ethnic tensions that had been simmering in the region for years. Greece and Bulgaria were among the countries attempting to redraw their borders, particularly in the region of Petrich. The dispute centred on the border demarcation established by the Treaty of Neuilly in 1919, which required Bulgaria to cede various territories after being defeated in WW1. The population in the disputed area was ethnically diverse, with Greek and Bulgarian people residing there. This diversity contributed to ethnic tensions and territorial claims.

The incident occurred on 18 or 19 October, 1925, when a border dispute escalated into a military confrontation. Greek and Bulgarian troops clashed near Petrich, resulting in casualties on both sides. 


Unsurprisingly, there are differing explanations of how it started. One version claims a Greek soldier ran over the border chasing his dog (hence, it is sometimes referred to as the War of the Stray Dog), and the soldier was shot by Bulgarian sentries. The second version claims that Bulgarian troops crossed the border and killed a Greek officer and sentry. We have no idea what happened to the dog before anyone asks!

The Bulgarian government apologised and said it was a misunderstanding. The Greek government issued an ultimatum demanding that those responsible be punished and wanted two million francs in compensation for the families. Greece sent troops to occupy Petrich to enforce these demands. There was some fighting, with chetas of the Internal Macedonian Revolutionary Organisation (IMRO) joining in. Petrich was the headquarters of the Macedonian-Bulgarian committee, and their cross-border raids were not uncommon. Over 50 people, primarily Bulgarian civilians, died.

The incident raised concerns of further escalation (possibly including Yugoslav or even Italian troops), and the League of Nations intervened before Greek troops crossed the border. However, some newspapers claimed they captured the town. The League mediated negotiations between Greece and Bulgaria to defuse the situation, and in 1927, Greece and Bulgaria signed the Petrich Agreement (also known as the Treaty of Petrich). This agreement included compensation on both sides, redefined the border in the Petrich area and established mechanisms for resolving future disputes peacefully.

The number of troops involved is unclear, although the initial Greek information was that they had been attacked by a regular Bulgarian battalion with machine guns. This sounds unlikely and is more likely to reflect the febrile state of the Greek war ministry at the time. The response was to order the Greek 3rd and 4th Corps to advance to the border. Again, it is unclear how many troops were actually sent. The Bulgarians got less excited and treated it as another border incident, ordering its forces into defensive positions with orders only to fire if attacked. The Bulgarian army was limited under the Treaty of Neuilly to 20,000 men, with a further 13,000 para-military forces and frontier guards. This meant they would be heavily outnumbered by the Greek army in any protracted conflict.

The terrain around Petrich is mountainous, with peaks of 1400-1600 metres. The Metaxas line fortifications, which gave the Germans so much trouble in 1941, marked on this map, hadn’t been built in 1925. So, my Bulgarians have taken up defensive positions in light cover, and a much stronger Greek force makes the attack. The Greeks may have had some mountain artillery, but this would have been an infantry battle.

We used my 15mm figures of the period. According to Knotel, the Greek uniforms had stayed the same. He is less clear about the Bulgarians, who apparently reverted to their early war uniforms from the predominately late-war German ones. Either way, not even I will be building a fresh army for this conflict!

Further reading, although this is focused on the diplomacy:

J. Barros, The Greek-Bulgarian Incident of 1925: The League of Nations and the Great Powers, (Proceedings of the American Philosophical Society, Vol. 108, No. 4, Aug. 27, 1964), pp. 354-385.


Sunday, 1 October 2023

The Khotyn Campaign of 1621

This is a new book by Michal Paradowski on the Khotyn campaign 1621 fought between Poland and the Ottoman Empire. This isn't your usual set-piece battle, but it's closer to a siege in some ways.

The author starts by outlining relations between the Polish Commonwealth and the Ottomans in the early Seventeenth century. The Polish border stretched down to Moldavia, a tenuous vassal of the Ottoman Empire. Moldavians fought on both sides in this campaign. To the east were the Tartars, Ottoman allies who regularly raided into Poland, challenged by the cossack regions, which were loosely part of Poland at this time. A treaty was signed in 1617 to stop these raids both ways, but little changed in practice.

The earlier 1620 campaign gets a chapter. This went badly for the Poles, who were forced to withdraw using their wagons (tabor). The use of war wagons in wargame rules has been the subject of much debate over many years. There is an excellent contemporary description of how they were organised (page 34), which should be compulsory reading. Fortunately for the Poles, the very capable Ottoman commander, Iskander Pasha, was later killed, and his replacements were not nearly as competent. 

Both military systems are covered. The Polish-Lithuanian forces included the classic indigenous units of the Polish army, including winged hussars and cossacks, as well as mercenary units in the western style, Reiters and infantry. Cossacks were mostly foot during this period; their horse were akin to dragoons, and their boats raided as far as Constantinople. Polish recruiters travelled Europe, including Britain, and a small contingent of Irish, Scots and English fought in the campaign. The Polish envoy remarked, 'Irish are best, as they are tough and good Catholics; Scots are also tough but they are really serious heretics.' I was surprised about the high proportion of hussars, although we must be cautious about the difference between paper strength and reality. In total, about 25,000 troops were available to the Polish commander. 

The Ottoman numbers are even less reliable. One Polish chronicler claimed 500,000 men accompanied Sultan Osman II on this campaign. The author plumps for around 60,000, but he carefully explores the sources so you can make up your own mind. They included all the classic types, primarily provincial sipahi, Kapikulu cavalry, Janissaries and Tartars. There was also a significant Moldavian and Wallachian contingent.

The Poles assembled their forces for the campaign and advanced into Moldavia. They crossed the Dniester River and established their camp at Khotyn. The position was defensible, with a castle on one flank. The Poles started to dig in with field fortifications when they were attacked. The Ottomans concentrated on the weaker flank held by the cossacks and built their own bridge over the river to threaten the Polish supply lines. German officers with the Poles were very impressed with the Ottoman bridge. Ottoman military engineering is worth further study. 

The rest of the book is a daily campaign diary; as the Ottomans attacked, the Poles sortied out in a battle that raged for over a month. In the end, a treaty was negotiated that allowed the Polish forces to withdraw back to Poland. It may not have been a great victory, but it did halt Ottoman expansion into Poland. Losses are contested, but there were probably around 20,000 on each side.

This is an excellent description of the campaign and warfare generally on this front. It is well illustrated with colour plates of the main troop types. Diaries give a personal view of the fighting alongside the strategic factors.

I dusted down my 28mm Polish and Ottoman forces for a couple of games of Pikeman's Lament last weekend. The Poles came out best in both games, mainly due to the charging power of the winged hussars. Although I was playing the Ottomans, the hussars are a lovely wargame unit.


Thursday, 28 September 2023

Lion Let Loose

 This is the latest in my Nigel Tranter bedtime re-read. It covers the reign of James I of Scotland, not to be confused with James I of England, who was also James VI of Scotland. OK, you can be confused!

Not one of Scotland's better-known kings, James I was born in 1394 and was King of Scots from 1406 until his assassination in 1437. 

His father, Robert III, was ailing, and the real power in the country, the Duke of Albany, had James' brother and heir killed. He was hidden on the Bass Rock in the Firth of Forth for his safety and then sent to France. However, his ship was captured by English pirates, and he was held in captivity in England by Henry IV and then his more famous son, Henry V. His captivity lasted 18 years.

This was the tail end of the Hundred Years War, in which the Scots allied with the French. This was primarily to keep the English monarchs busy in France rather than invading Scotland. Significant Scots forces were sent to France and had an important victory against the Duke of Clarence at the Battle of Baugé in 1421. James accompanied Henry V in some of his later campaigns in France, which put the monarch in a difficult position. He also provided an English wife, Joan Beaufort, a cousin of the future Henry VI.

After Henry's death, James was released for a hefty ransom. Not that he was welcomed back to Scotland by the Albany faction. Tranter, not for the first time, takes a sympathetic view of James I's actions on his return. Tranter portrays his savage destruction of the Albany faction and his Inverness Parliament, which at least partially tamed the Highlands, as a reluctant response. Modern historians are less positive. In fairness, medieval Scotland was a tough country to rule, with internal treachery, the English over the border and the Highlands semi-detached. 

James was assassinated in 1437 by the relatives of the Albany faction. However, they failed to capture and kill his son and were later caught and executed. So, the Stewarts continued on the throne.

Perhaps not one of the most gripping of Tranter's novels. The long period of captivity, more like house arrest, is challenging to turn into good historical fiction. However, it picks up in the latter parts of the book.

Typical Scots infantry sent to France during the Hundred Years War.


Monday, 25 September 2023

Air Campaign: Korea 1950-53

 This is a new Osprey book by Michael Napier covering the strategic bombing campaign in the Korean War. Timely, as I am planning to add the air warfare dimension to my Korean War project, using Blood Red Skies and the new Wing Commander supplement. It's on my Partisan show list.


Air power was crucial in shaping the Korean War battlefield and applying strategic pressure to North Korea and China. This book describes the strategic employment of air power by the United Nations Command (UNC). While this book covers strategic bombing, the limited theatre of operations meant that strategic and tactical operations could be blurred. 

Several features of North Korea made bombing challenging. The flying weather is often poor in the summer, so October to March was ideal. The railway system was a key target, but it was designed by the Japanese builders to be more robust. North Korean engineers were also good at quickly repairing damage, as this was the primary method of moving supplies to the front. Bombing bridges is, in any case, a challenging target, made especially difficult with the crosswinds, even in winter. 

The US Far East Air Force led the bombing campaign with their B-29s, operating mainly from Japan. They were initially unopposed other than a handful of Yak-9s. However, introducing Soviet Mig-15s forced the bombers to fly higher and switch to night bombing with less accuracy. The Soviets had experienced pilots dressed in North Korean uniforms, and their regiments were rotated through the theatre. Chinese pilots, in contrast, were inexperienced and quickly withdrawn. US Fighter escorts were added using the F-84 Thunderjets, and when these proved ineffective, the F-86 Sabre. The F-84 was switched to ground attack in formations as large as 60 aircraft.

Tactically, there were similar disagreements to the Normandy campaign of WW2. The air force objected to being used in close support missions, and there were political restrictions on bombing China or the Soviet Union. Both sides were trying to avoid escalating the war. This meant much of the fighting occurred near the North Korean airfields, in an area known as 'Mig Alley'. The air force eventually ran out of industrial targets and switched to military training facilities. There were also attacks on the dams that drove hydro-power stations, deploying naval aircraft from carriers.

Overall, the bombing campaign had mixed results. As North Korea could call on China and the Soviet Union, the destruction of its industry didn't have the same impact as the bombing campaign against Germany in WW2. Thanks to its breadth and complexity, North Korea could also repair its supply networks.

The author highlights five lessons to be learnt from the strategic bombing of North Korea:

1. A World War II-style bombing campaign against a partially industrialised economy is unlikely to prove decisive.

2. Interdiction against a wide and complex resupply system routed through difficult terrain requires massive force numbers to be effective.

3. Neither strategic bombing nor interdiction can be fully effective if much of the enemy industrial base or source of resupply exists in a neighbouring country where it cannot be attacked.

4. It is essential to deny the enemy the opportunity to operate its aircraft freely within its own borders.

5. The ingenuity and ability of the enemy to repair damaged infrastructure must never be underestimated.

It might be argued that all five lessons had to be relearned during the Vietnam War in the subsequent decade.

This book has all the elements you would expect from the Osprey series. Concise text, plenty of period illustrations, good maps and colour plates. It is a really useful addition to the Korean War library.

Saturday, 16 September 2023

British Destroyers 1892-1918

 This book is by Jim Crossley in the Osprey New Vanguard series, looks at the development of Royal Navy destroyers in the period up to the First World War. This is a period of naval warfare I know little about and is an introduction to my HMS Ambuscade project.


HMS Ambuscade, in this period, was an Acasta-class destroyer. This appears to be a step up from the previous frigate status, although destroyers were only introduced into the world's navies in the 1880s. However, everything is relative because the HMS Ambuscade we are planning to bring back to the Clyde is a Type 21 frigate and is over 100 feet longer than the WW1 Ambuscade. The size of a modern frigate was brought home to me when I visited Portsmouth in the summer. HMS Iron Duke was in port, and I was astonished to discover this large warship was a frigate.

Destroyers in this period were developed in reaction to the torpedo menace. Here, a bit of Balkan history slips in because the Imperial Russian Navy were one of the first to launch torpedoes at the Ottoman Navy in 1878, sinking a small gunboat. The Royal Navy called their early vessels Torpedo-Boat Destroyers until 1919. The early classes were small ships able to sneak into harbours and launch torpedoes at short range. The development of the 18-inch and then 21-inch torpedoes meant the destroyer could be used with the battlefleets at sea. In theory, attacking at up to 10,000 yards, although in practice, there was little chance of hitting anything at that range.

As the type developed, they got bigger, with the Tribal class at up to 290ft long, setting the standard for future generations of destroyers. Still a lot smaller than modern frigates. The Acasta class was renamed K-Class in 1912 before HMS Ambuscade was launched in January 1913. These ships were 267ft long armed with three 4in guns, one 2pdr gun and two 21in torpedoes. They had a speed of 31 knots. The Royal Navy gave their destroyers a powerful gun armament, which paid off in actions against German destroyers who relied heavily on torpedoes. 

Tactically, the challenge for a destroyer serving with the fleet was to get close enough to the larger enemy ships without being blown out of the water. There were two options. Steer towards the last shell or turn violently when you see the enemy gun flash. German battlecruisers were also well protected against torpedoes, even if you could hit one in battle conditions. The British fired 96 at Jutland and scored six hits. One of those came from HMS Ambuscade. I had thought boarding actions were consigned to the Napoleonic wars, but the author describes a Dover Patrol action when HMS Swift rammed a German ship, and a boarding action commenced.

In conclusion, destroyers made an important contribution to the development of the Royal Navy, but it did not end the era of the big-gun warship as the Germans had hoped. This book has all the technical specifications, lovely colour plates, and plenty of illustrations. All you need for an introduction to the period.

I managed to get this postcard in the Rotary Photo series recently. On the left is George V, and on the right is Admiral Jellicoe.


Friday, 15 September 2023

The Flowers of Chivalry

 The Bruce is dead, and a child king is on the throne. It was one of the most dangerous times, internally and externally, for any medieval kingdom. This is the setting for Flowers of Chivalry, the latest in my bedtime Nigel Tranter re-reading project.

In this book, Tranter returns to a favourite technique of telling the story through a lesser-known figure close to the main action, often from his Lothian home. In this case, Sir Alexander Ramsay of Dalwolsey a local noble who was one of the more effective Scots knights of the period. Having a child king is less dangerous when there is a strong Regent. However, the book starts with the death of Thomas Randolph, Earl of Moray, one of the last living close comrades of Robert the Bruce.

David II succeeded to the throne at the age of five. After Moray's death, Scotland was ruled by a series of less-than-effective regents. Edward III took advantage of this by invading and putting Edward Baliol on the throne. He put his governor in charge when he failed to counter the inevitable insurgency. Following the English victory at the Battle of Halidon Hill in 1333, David was evacuated to France, where he remained in exile until it was safe for him to return to Scotland in 1341.

The book covers the period up to his return in 1341 when he took back the throne. Although the wars with England continued, they merged with the Hundred Years War. Scotland was allied to France, and at least the fighting on the continent distracted Edward III long enough to give Scotland the occasional breathing space.

This is a lesser-known period of Scottish history, told in the typical Tranter style. Ramsay arguably did the most with Sir William Douglas to save David's throne and keep Scotland independent. There were a few set-piece battles, but again, this was a period of small wars well suited to refighting on the tabletop with rules like Lion Rampant.

Some of my 28mm Scottish infantry of the period