Welcome to my blog!

News from a wargamer with a special interest in the military history of the Balkans. It mainly covers my current reading and wargaming projects. For more detail you can visit the web sites I edit - Balkan Military History and Glasgow & District Wargaming Society. Or follow me on Twitter @Balkan_Dave
or on Mastodon @balkandave@mastodon.scot, or Threads @davewatson1683

Sunday, 15 January 2017

Roman Legionary AD 284-337

This is not so much a new Osprey as me catching up. Warrior 175 by Ross Cowan takes the story of the Roman legionary up to the age of Diocletian and Constantine the Great.

This was a period of great turbulence for the Empire, not least because of the religious conversion of the state from Diocletian's pagan persecution of Christian soldiers (they had to perform a sacrifice), to Constantine's Christianity. The conversion was inevitably gradual and Constantine was fairly tolerant for a period, even devising a special parade for pagan soldiers.

This period marks the climax of the traditional legionary system and the organisation into cohorts and centuries would be recognisable to a Roman of an earlier period. What started to change was the organisation of legions, dividing them up into detachments, leading to the frontier units (Limitanei) and the elite field army units (Comitatenses). While infantry remained the backbone of the army, cavalry was becoming more important.

The book explains how legionaries were recruited, trained and equipped. Then we get chapters on the organisation of the legions and some examples of campaigns. Specific soldiers are used to illustrate the system, showing that they certainly travelled a lot - at least in the field army.

This encouraged me to dust down my late Roman figures, more accurately Arthurian in my case. A number of years ago we had a fun WAB 'Age of Arthur' campaign at the club. I used my current favourite set of rules, 'Lion Rampant' for the game, with grateful thanks to David Sullivan for his work on taking the rules back to this period. I see Gripping Beast are also bringing out a supplement for this period next month.

I chose the Carpi as the opponents. There is some disagreement about the ethnic basis for this tribe, but if not a Dacian tribe, they are very similar. They resided in the eastern parts of modern Romania and fought a series of wars against the Romans during this period. Constantine defeated them in 316-17 and they were resettled into the Empire.

The scenario involved a legionary unit defending a village where there is a rather robust religious conversion going on. The Carpi attack the village and the remaining units in the Roman force come to the rescue.

In the game, while the legionaries did get pushed back, the Carpi movement dice were pretty bad and a series of piecemeal attacks were repulsed. Rome triumphant again!


And here is the army list for two 24 point 'retinues'


Saturday, 14 January 2017

The Serpent Sword

My latest fiction read has been The Serpent Sword by Matthew Harffy - the first in his Bernicia Chronicles.

The setting is Dark Ages Bernicia, an Anglo-Saxon kingdom that roughly covered Northumbria and south-west Scotland in the 6th and 7th centuries, before it merged with its southern neighbour Deira to become Northumbria.

Our hero is Beobrand, a young farmer who follows his warrior brother to Bernicia, only to find he has been murdered. With some minimal training, he joins the army of King Edwin, only to be present at the disastrous defeat at Hatfield Chase, to Cadwallon of Gwynedd. Escaping the battle, his wounds are patched up at a monastery, before he joins a small group of warriors who roam the countryside.

He then leaves the group and joins the army of the new king, Edwin. I won't spoil the outcome, which as you would expect ends with not one, but two, climatic battles. There is a sub-plot regarding his brother's murderer and a bit of romance as well.

This is everything you would expect from historical fiction. It's very much in the Cornwell mode and has some similarities with the Kingdom series, although earlier in time. We even revisit Bebbanburg.

I found the earlier parts of the book a little slow going, but by the end it was hard to put down. There are four more in the series so far and are very reasonably priced on the Kindle. I have the next one downloaded already.

For the wargamer, the battles are small scale, best suited to large skirmish rules like Saga, or the adaptations of Lion Rampant.


Saturday, 7 January 2017

The Caucasus 1942-43

The best bit about returning to work is a lunchtime spending my book tokens on real books in a proper bookshop. The first read of my significant haul is the Osprey Campaign 281 - The Caucasus 1942-43 by Robert Forczyk.

Germany faced a number of strategic options for its 1942 offensive on the Eastern front. The generals favoured another go at Moscow, but Hitler understood the economic imperative to capture oilfields to keep the economy and his army going. It's one of the ironies of WW2 that Hitler's invasion of the USSR was only possible because of oil stocks sourced from the USSR.

Oil in the USSR meant a swing to the south and the Caucasus. A decision reinforced by the allied occupation of Iran, creating a vital supply line of US and British war material to the USSR. The German plan was to protect the flanks with a subsidiary offensive towards the Don River and Stalingrad, while Army Group A commanded by List attacked the Caucasus. The spearhead of the attack was 1. Panzerarmee commanded by von Kleist.

The Russians, commanded by the old civil war cavalry commander Budyonny, had a patchwork of units, many hugely understrength, with limited tanks. He would fight a largely defensive campaign, cut off from the main supply lines to the north.

The German attack fell far short of the planned blitzkrieg, with too many targets and key units were withdrawn before the campaign was completed. They took most of the North Caucasus, but the campaign ground to a halt in the mountains. More importantly, the damage to the few oil wells the German's captured meant very little oil was made available.

The book is in the normal Osprey campaign format. Pen pictures of the commanders, the opposing forces and an Orbat. This is followed by a narrative of the campaign with excellent maps and lavishly illustrated. The colour plates by Steve Noon are particularly good.

For wargamers this is a very interesting campaign. The North Caucasus is largely plain, albeit with many rivers that the German engineers had to find ways across. Railway lines were important for supply. Then the mountains, which are some of the highest in Europe, a huge challenge even for the Gebirgsjager and their Romanian counterparts.

Troop types are also very varied. Tanks are mostly early war types, largely PkwIII for the Germans. Mostly T26 light tanks for the Russian's, supplemented by Lend Lease. The M3, Valentine and Matilda tanks made up nearly half the Russian tank strength.

German forces relied heavily on combined arms battlegroups that work well on the tabletop. Two mountain divisions as well a Romanian mountain troops and cavalry. They also made extensive use of Brandenburger's for infiltration and raiding - often working with local Chechen insurgents. There was air and naval support, but this became patchy later in the campaign as units were redeployed northwards.

The Russians have lots of interesting units as well. Armoured trains, cavalry and naval rifle brigades, supplement the traditional rifle divisions and NKVD security units. They also had patchy support from naval and air forces.

Overall, this is an interesting campaign with the opportunity to use a variety of equipment and troop types in contrasting terrain. This book is an excellent starting point.


Russian 45mm ATGs from my 15mm figures


Wednesday, 4 January 2017

Conan and Dragon Rampant

The last painting session of the holidays included some more character figures from the Conan board game. These include Conan himself, the wizard Hadrathus, Thak, Skuthus priest of Set and of course a princess for Conan to rescue - over and over again!


For the final game of the holidays I used Dragon Rampant rules. Conan with Hadrathus and his bodyguard, supported by Aquilonian archers, spearmen and mercenary light horse - are off to rescue the Princess, a captive of Skuthus in the ruined tower. Skutus has his giant snake and a band of demons. Two 24pt armies in total.

The archers force a wild charge from the demons, who are weakened by bow fire from horse and foot bows. Bolts of long range fire from Skuthus were not enough to support the demons. Then the snake slithered out of the woods and forced back the spearmen, who were eventually saved by Conan himself. With his forces routed, Skuthus slinks away to fight another day, and the princess is rescued.


Dragon Rampant are a great set of rules for a quick game. Highly recommended.

Sunday, 1 January 2017

Happy New Year! What to do in 2017?

Happy New Year! May your dice always roll six (except when that’s a blunder!) and your paint pots never run dry this year.

I have been making valiant efforts to reduce my lead/plastic pile in recent months, so I am resisting the temptation to start too many new projects. I have now painted most of the character figures from the Conan game, but that still leaves lots to go. I also have some unfinished projects that are more difficult to get enthusiastic about. Some Federale horse for Pancho Villa, Japanese and Russians for the Mongolian campaign and a few other bits and pieces.

My main new project for 2017 is going to be the 1848 Hungarian revolution, using the excellent Steve Barber figures. The infantry are ready to go and hopefully the range will add artillery and cavalry in due course.

I am tripping over rule sets, after the plethora of new publications in 2016. I can see me using Pikeman’s Lament when it comes out in January and I hope Pendragon get around to doing the long awaited update to Blitzkrieg and Corps Commander rules this year. I’ll have a look at Swordpoint, but I am happy enough with Hail Caesar and Lion Rampant.

I do like an anniversary for inspiration for projects.

0bviously WW1 centenaries continue into 1917. The Western Front battles of Vimy Ridge, Messines and Passchendaele will get a lot of coverage. There is also the Middle East with the battles for Gaza and the fall of Jerusalem – dust down The Lighthorsemen film! Then we have the Russian revolutions, February and October versions.

The Macedonian front was relatively quiet in 1917. The year started with battles at Doiran, then Greece joined the war in July and the year ended with operations in the Struma Valley to establish a winter line on the river. Politically, the Corfu Declaration enabled the establishment of Yugoslavia and there was the Great Fire in Salonika.

150 years ago in 1867 the Austro-Hungarian Empire was established and Garibaldi’s troops marched into Rome. I recently dusted down my Italian troops of the period, so I might give that a go.

This is the 300th anniversary of San Martin’s crossing of the Andes in 1817 and subsequent battles in Chile and Peru. We did this as a series of display games in 2007, so I have all the figures for this in 28mm. The anniversary will be a good excuse to dust this collection down and try out the battles with a new generation of rules.

The Third Anglo-Maratha War also broke out in 1817. I have some suitable figures for this after my Moghul and Plassey projects, so again an interesting period that thankfully doesn’t require extra painting.

Back another 100 years and we have Prince Eugene capturing Belgrade in 1717. I have all the figures we need for that after doing this battle in 2006 display games. This is a good excuse never to get rid of figures! There was also a major Tartar invasion of Transylvania in 1717.

1517 will probably be best remembered for Luther’s 95 Theses, which formed the basis of the protestant reformation. It was also the year that the Ottoman’s ended the Mamluk Sultanate.

Back into medieval times we have the Barons War, Battle of Lincoln in 1217. There have been several good books on this neglected period recently. However, of much greater interest to me is the elevation of Stefan Nemanjić to be first King of the Serbian lands. In 1117 there were a series of battles between the Hungary and Venice for control of the northern Dalmatian coast. Sources are limited for this, but it does have skirmish game appeal.

In 917, Tsar Simeon of Bulgaria repulsed Byzantine invasions. There is an excellent podcast series on this period to get anyone interested. There was a better outcome for the Byzantines in 717 when they repulsed the Arab siege of Constantinople. 100 years earlier in 617 they bought off the Sassanid threat to the City and efforts by the Avars later in the year.

Finally, my first wargame army was the Carthaginians. This year is the anniversary of Hannibal’s victory over the Romans in 217BC at Lake Trasimene and the subsequent Fabian strategy deployed by the Romans while he rampaged throughout Italy. If you have successor armies, 100 years earlier they battled for control of Macedon after Alexander’s death.


So, plenty of inspiration in this year’s anniversaries. Thankfully, few require the collection of new armies, although I am sure wicked figure manufacturers will do there very best to tempt us all!


San Martin's Horse Grenadiers from 1817

Friday, 30 December 2016

1859 - Second Italian War of Independence

I decided to give Sharp Practice 2 another go over the holidays. Also an opportunity to dust down another PoW army I haven't used for some time, the Sardinian's and Austrian's of 1859.

Having lost the First War of Independence, Sardinia/Piedmont provoked the Austrian's into invading and so dragging their French allies into the conflict. The war came to a conclusion at the Battle of Solferino 21-14 June 1859, when the Austrian's were defeated and Lombardy became part of the new Italian state.

I am still struggling a bit with the structure of the rules. If you don't play them regularly there are lot of bitty rules that it is easy to forget. The QRFs aren't a lot of help, so I think the solution is a process chart. I did a similar one for Bolt Action.

Anyway, a few pictures of the game. From memory the figures are mainly Frei Korps. Some are the early soft metal versions - hence the missing bayonets and often more serious surgery!


And the army list for the game.


The battlefield of Solferino is also well worth a visit. Much of the battlefield is as it was and there are several monuments and a museum. 


Germanica

My fiction reading this holiday has been Robert Conroy's Germanica.

This is alternative WW2 history. The essence of the story is that Goebbels escapes to the Alpine redoubt with enough troops to be a significant threat. The allies are war weary and the domestic pressure for peace is building.


We get a bit of the strategic overview, including the neglected role of Switzerland during the war. The action on the ground is based around OSS operatives across the border in Switzerland and a US captain with the leading US infantry division.

In fact, Hitler opposed the concept until it was too late in April 1945. Despite support amongst some in the German high command, it never got off the ground. However, the concept did concern allied planners who concentrated resources to cut off retreating units from going there.

It is a least an interesting 'what if?'. What would have been the allied reaction to the potentially heavy casualties involved in attacking narrow Alpine passes. Particularly if Germany had a viable atomic bomb as a deterrent.

The author makes a decent go at the alternative history and makes a readable human story around the main characters. Perhaps not the best historical fiction, but if alternative WW2 is your thing it is worth a read. Some obvious scenarios here for those buying into Warlord's Konflict 47 rules.

Thursday, 29 December 2016

Austro-Hungarian Cruisers and Destroyers 1914-18

The final part of the Osprey pre-xmas Balkan trilogy is Austro-Hungarian Cruisers and Destroyers 1914-18 by Ryan Noppen.

The Austro-Hungarian navy suffered from pre-war budget restrictions, particularly as the Hungarian parliament saw little value in the navy. However, much of the modern day Croatian and Montenegrin coastlines where part of the empire in 1914 and had to be defended.

Before the war the Austro-Hungarian empire had developed a significant merchant marine that required an expanded navy. This took the navy from a coastal defence force, to one that could project power overseas - or at the very least fly the flag. For example, the cruiser Zenta took part in the crushing of the Boxer Rebellion in China and the relief of Peking. After promising work for the Hungarian yards at Rijeka, a more balanced fleet was developed.


The author describes the cruiser and destroyer classes constructed primarily in the Adriatic shipyards, but with a few ordered from Britain. It is largely a story of catching up with developments in other navies, with armour and guns getting heavier and larger. By 1914, even the most successful designs, like the Huszar class destroyers, were considerably smaller than their opponents. None the less, they often held their own.

The strategy for the capital ships was of a 'fleet in being' and it spent most of the war in port, covering the Northern Adriatic. The lighter ships had a more active campaign and the author describes the main actions in the second part of this book. Initially raiding and bombarding the Italian coast, they quickly dominated the Adriatic despite the larger forces arrayed against them.

The action moved to the Southern Adriatic at the end of 1915, when the navy attempted to stop the Serbian evacuation to Corfu from Albanian ports. This led to the Battle of Gargano and other sorties against Durazzo. While they failed to stop the evacuation, the capture of Mount Lovcen and the collapse of Montenegro, meant that the Southern Adriatic base of Cattaro (Kotor) was fully operational.

This led to a series of actions against the allied Otranto barrage, a series of light ships, often British trawlers, who attempted to keep U-Boats out of the Mediterranean.  The barrage was largely a failure, assisted by the Austro-Hungarian attacks. Most famously, the Battle of the Otranto Straits in May 1917.

By 1918, levels of discontent in the navy were high, culminating in the Cattaro mutiny. However, the lighter ships remained loyal until the end of the war. The remaining ships were allocated to the allied powers, renamed or scrapped.

Osprey Vanguards can often be rather dry technical descriptions of weapon systems. That isn't the case here, with a clear description of strategy and a concise narrative history of the naval campaigns. This is supplemented with a fine collection of photographs and some lovely artwork by Paul Wright. Not just the technical ship plates, but a couple of action paintings that would grace any art gallery.

You can visit the main ports today.

Pula is part of modern Croatia and has a small naval museum up in the old Venetian fortress above the harbour. For Austro-Hungarian fortifications, I recommend Fort Bourguignon  further down the coast. But be warned, it's not easy to find.


The very best examples of Austro-Hungarian fortifications are around Kotor (Cattaro) in modern Montenegro. The forts below defend the entrance to Kotor Bay. There is also an excellent maritime museum. Kotor is certainly the most stunning place on the Adriatic, an absolute must visit place.


and the stunning Kotor Bay itself from Mount Lovcen. Think Norway with great weather!


Wednesday, 28 December 2016

Byzantine Naval Forces 1261-1461

Part two of Osprey's end of year Balkan spree is Byzantine Naval forces 1261-1461 by Raffaele D'Amato.

After the fall of Constantinople to the army of the Fourth Crusade, the recovering Byzantium recognised the need for a strong naval force. While they relied on allied or mercenary ships, primarily from Genoa, they also created their own forces.


These were built around three regiments.

The Gasmouli lived in and around the City and were of mixed Latin and Greek parentage - the name may actually mean 'bastard'. They were certainly ferocious warriors, described by one western source as 'hungry for carnage and death' - and much more besides! They served as marine soldiers and were lightly armed.

The marine Tzakones were originally recruited from the Peloponnese, specifically ancient Lakonia. They supplemented the Gasmouli as marines.

The third unit were the Prosalentai. These were native Romans, recruited from small peasant freeholders. These were the oarsmen of the fleet and each settlement probably provided a fixed number of men.

The ships of the fleet included Dhroman's with bow turrets for troops. Then Trieres, a three oar-level galley and Moneres, a galley with a single level. These were supplemented by a variety of transport ships and lighter fishing type vessels. The fleet's main base was in the Propontis district of the City. There were also provincial fleets at Thessaloniki, Lemnos, Tenedos and on the Danube. The strength of the fleet varied considerably, but at time of war could be as large as 200 ships.

The author takes us through the limited sources of the period, to describe how the fleet was organised and manned. This includes an overview of the main operations and three representative naval actions. The troops manning the fleet are covered in some detail including their weapons, dress and other equipment. This includes the evidence for the use of Greek fire. Peter Dennis provides the usual high quality colour plates.

With the current wargaming trend towards skirmish games, this book should inspire small scale raiding actions of the period using Lion Rampant or similar. The wicked Venetian's being the main enemy. There are no specific figure ranges that I can find, but Byzantine marines wore a wide variety of helmets and other equipment, so most medieval ranges will provide some suitable figures.

Tuesday, 27 December 2016

World War II Croatian Legionaries

Osprey had a bit of a Balkan splurge prior to xmas, providing me with a pile of holiday reading.

I started with World War II Croatian Legionaries by Vladimir Brnardic. You might think the Croatians have had quite a bit of coverage, but this title is about Croatian troops who served under Axis command, not those who served in the Croatian defence force or the Ustasha militia.


These Croatian's were literally under Axis command, with almost all the officers and many of the NCOs being German, or at least ethnic Germans who lived outside the Reich. It started with the Croatian legion, the 369th Reinforced Infantry Regiment and then grew into three infantry divisions - 369th, 373rd and 392nd. They also provided significant troops for the Waffen-SS divisions - 13th Handschar and 23rd Kama mountain divisions.

The Germans also recruited Croatians into air force and naval legions, as well as German-Croatian police units for internal security operations.

Even the Italians got in on the act. The Croatian state, somewhat reluctantly, provided troops for the Italian-Croatian Legion, a light motorised battalion.

The author takes us through the service history of each unit. The focus of their service was against the Partisans in Yugoslavia, but several also fought on the Eastern Front. The 369th Infantry Regiment was destroyed at Stalingrad and the Italian Legion was completely wiped out on the Chir River line in December 1942.

Being an Osprey book, there are photo-realistic colour plates by Viseslav Aralica and lots of period photographs. The Croatian's wore German and Italian uniforms, with the main distinguishing feature being the distinctive Croatian red and white chequered badge. Wargamers can therefore use axis models and just paint the badge on. Not easy, but someone may do a transfer. Warlord do Fez capped heads for the Handschar division (see below from my collection).

Handschar


Italians


Monday, 26 December 2016

Open Combat revisited

My Xmas game was an opportunity to revisit Open Combat since getting the nice new glossy hardback and dice as part of the kickstarter. For those not familiar with these rules, They allow you to point up all sorts of historical and fantasy skirmish forces, creating balanced games between genres if you want.

The game also allowed me to get my newly painted monsters from the Conan board/figure game on the table. I like the board game, but I suspect I will get more use from the figures using Open Combat and Dragon Rampant.

Here we have a couple of demons.


and then a rather tasty giant snake.


Then, onto the game itself. My merry band of adventurers included a first outing for my Frostgrave wizard and his apprentice. Together with Bugman and his dwarf rangers. Some of my very first fantasy figures from the old Citadel range.


We had a cunning plan for grabbing the jewels from the demon fort. Bugman would distract the Demon knights and the big hairy demon, while the wizard and apprentice sneaked into the fort.


It started well, with dwarf crossbows weakening the demons. The Open Combat dice are useful, but not essential, as the rules are very simple and the QRF covers most of it.


But they soon got a bit too close for comfort. Crossbows down and get stuck in with the axe - the slope was useful too.


Meanwhile, the sneaky attack on the fort got disrupted when the giant snake slithered out of the wood. Those fangs are to be avoided! Glad I paid for the nimble and evade skills for our magic pair.


The Demon king hopped out of the fort to join in.


After that it was a slogging match. Sadly, both wizards died a fate worst than death, but Bugman and the boys saved the day. Held the hill and killed enough to reach the demon break point. But it was a close run thing!

Not sure they will accept these demon jewels as payment for a well earned pint in Bugman's Brewery, but the dwarfs will no doubt be persuasive....


Wednesday, 21 December 2016

Chosen Men

'Chosen Men' is a new set of skirmish rules for the Napoleonic Wars, written by Mark Latham and published by Osprey. Mark used to work with Warhammer Historical and produced Legends of the Old West and Trafalgar. More recently he wrote the Osprey fantasy rules, Broken Legions.

These are genuine skirmish rules with one model equalling one man. A typical unit is led by an officer and consists of 4 to 9 figures. A typical standard 350 point game on a three foot square table would have three units a side. (see roster below). The game is designed for 25mm figures, although I can’t see any difficulty in playing with other scales. Think Sharpe skirmish episodes, for the sort of game these rules are aimed at. Timely for me as my beloved being away on a course recently allowed me to work through the Sharpe boxed sets on Virgin!

The game starts with both sides rolling for initiative and war strategies. This gives a one off action that is played immediately or can be saved. In my test game the rifle unit was delayed a turn and the French light infantry had to undertake a command test when they strayed near the table edge. The idea is to represent the battle going on around this skirmish.

The action phase allows players to activate a unit alternatively, so you can pick your most vital unit first. Actions are move, charge, fire etc and each one costs a TAC point. Better units have more points, but as you can only use one action per move and can’t move and fire, I didn’t find this very restrictive. Movement is 6” for foot and 10” for horse, although a double move is an additional D6. The default formation is skirmish, but you can form into line and column if you want, with commensurate factor gains. You can also order a hold action which allows a delayed action later the phase. This allows you to react or fire in response to enemy movement. Firing is a straightforward accuracy roll to hit followed by damage rolls based on the units resilience . 

The next phase is melee, with weapon and unit melee factors and an ‘old style’ table to calculate the score to hit. Again, hits are converted into damage based on the units resilience. Most figures have one wound, but officers and cavalry have 2 or more. Then you apply combat resolution factors to find the loser who takes a command test.

Finally, there is the recovery phase, which involves rallying and moving fleeing units and checking victory conditions.

There are optional commander traits and strategies that you can purchase for army list points. I didn’t use them, but they clearly add some colour to a game, without being too overwhelming. There are also special rules like ‘crack shot’ and ‘devastating charge’, which again give additional factors in appropriate circumstances. The army lists are restricted to the Peninsular and Waterloo campaigns, but it wouldn’t be difficult to adapt them for other nations. You also get six scenarios.

The production quality is typical of the Osprey games series. A logical process and plenty of photo’s. However, there is no quick reference sheet, which means a lot of page turning. With all the special rules, your copy of the rules is going to be well thumbed. It really needs a decent process chart, otherwise you miss important rules.

These rules plug a gap in the Osprey series, for the period up to ‘The Men Who Would Be Kings’ colonial rules. However, the mechanisms are very different. It’s probably competing with Sharp Practice 2. If you don’t like card driven games, or the Lardies more random approach to unit activation, these rules might be for you.


My test game was a simple Peninsular action with light troops and cavalry. The standard game will probably be done and dusted in 90 minutes or so once you have a handle on the rules. If this a new period, then you only need a small number of figures. Significantly fewer than Sharp Practice. 


Finally, some eye candy from the test game.


Sunday, 11 December 2016

Glory, Hallelujah!

'Glory, Hallelujah!' is the title of the Back Powder supplement for the American Civil War. I bought it some time ago, but I have just got around to using it.

So what do you get for your £20, or usually cheaper? You get just about everything you need to game the ACW. A description of the armies, equipment and tactics - as well as masses of eye candy for uniform reference. There are optional rules to supplement Black Powder and plenty of army lists and scenarios. Even special rules for forts and river operations.

The production quality is nothing short of sumptuous. Even if you don't use Black Powder rules, this book is well worth the price.

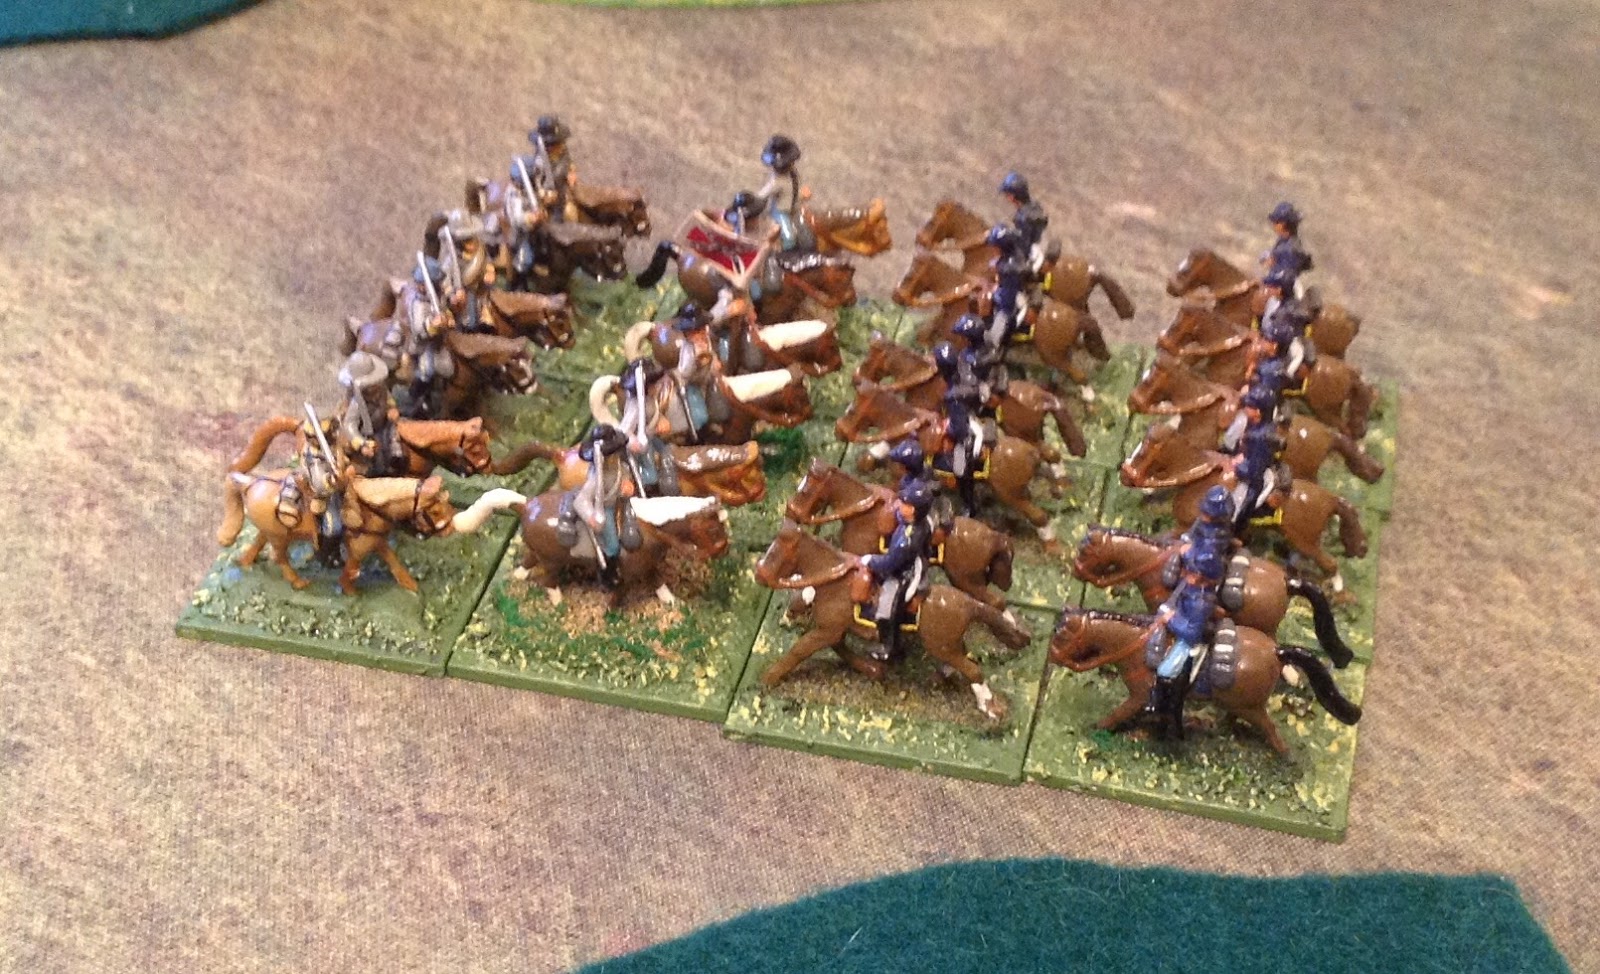
So onto the battlefield. I used my collection of 15mm figures for this game. I collected them gradually over many years and they are based for Fire and Fury, a rule set I never really liked. The special rules played well and gave a real feel for the period.

The objective was to capture the town. The Rebels got there first and held off two counter attacks.


I toured the Eastern battlefields of the ACW a number of years ago, en-route to Historicon. They are some of the best preserved battlefields I have visited and a credit to the staff involved. Here is my picture of the site of Pickett's charge at Gettysburg.


Thursday, 8 December 2016

Panzer III

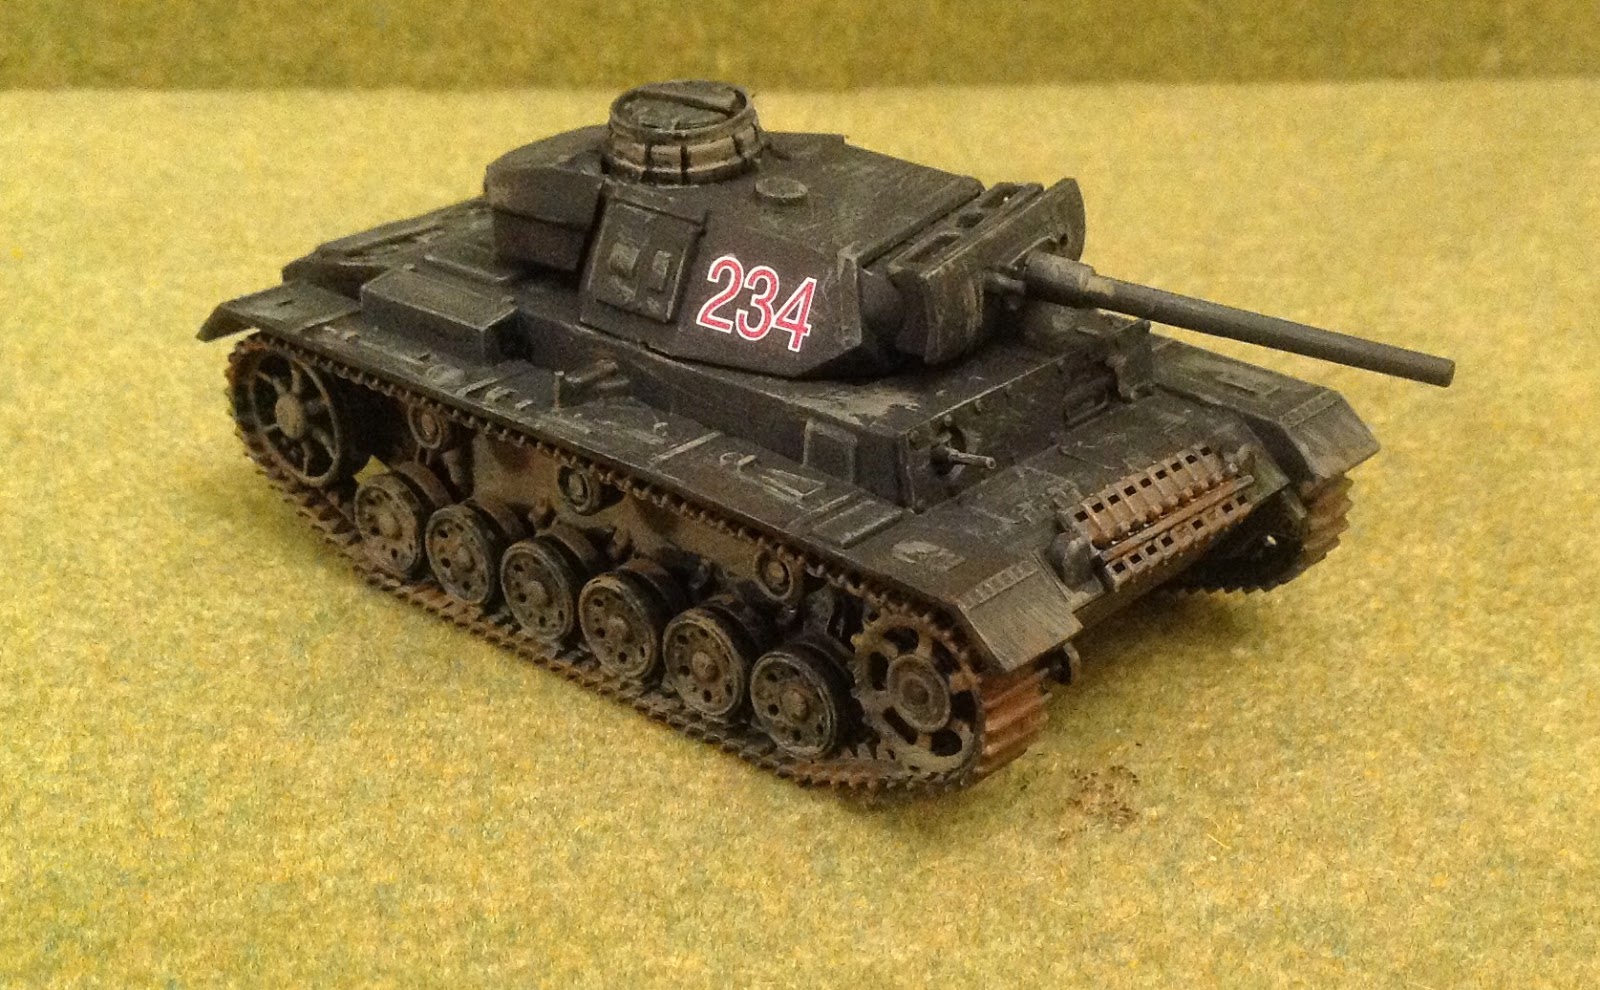
I have been making some further efforts at reducing my lead pile, or in this case plastic pile. The victim was a Rubicon 28mm kit of the German Panzer III. I say victim, as kits are not my favourite projects, I am at best all thumbs.

The Panzer III was intended as the primary battle tank of the German forces. However, when it initially met the Russian KV-1 and T-34 tanks it proved to be inferior in both armour and gun power. To meet the growing need to counter these tanks, the Panzer III was up-gunned with a longer, more powerful 50-millimetre (1.97 in) gun and received more armour but still was at disadvantage compared with the Soviet tank designs.


Despite my reservations about kits, this was very straightforward, with all the essential bits like tracks being one casting. Very clear instructions and all parts numbered - no need to try and guess how it goes together from a photo! A vast improvement on the Warlord/Italeri model that was nothing short of a nightmare and simply not robust enough for a tabletop model. Rubicon also give you a generous decal sheet.

I purchased mine from Scott's Models in Glasgow. Support your local model shop, or they are unlikely to be around when you need that pot of paint.


Sunday, 4 December 2016

Malaya and Singapore 1941-42

The Japanese invasion of Malaya and the fall of Singapore in 1941-42 was a military disaster of unprecedented proportions for the British Empire. Mark Stille covers the reasons for this very well in the Osprey Campaign No.300 'Malaya and Singapore 1941-42'.


From Churchill downwards this was not Britain's finest hour. The strategic assumptions were wrong and Churchill even failed to deliver on his own poor plan. On the ground, the British Empire commanders failed to take advantage of their material superiority in important categories through poor planning. The consequences were a staggering 138,708 casualties, 130,000 of which were prisoners of war. In contrast the Japanese 25th Army used intelligent planning and relentless initiative to keep the all important initiative. Tanks played an important role, but it was the Japanese infantry who really delivered the victory.

This campaign was one of my recent wargame projects, so I have read a number of detailed campaign histories and memoirs. Mark Stille has written a very good concise history of the campaign with lots of quality photographs and the excellent illustrations by Peter Dennis. What Osprey do better than other publishers is excellent maps, both of the campaign and the key battles. If you are thinking of doing this campaign on the tabletop, this book is an ideal starting point.

This represents a typical action during the campaign, using Bolt Action rules and 28mm figures.